

6.1 Understand the project structure
Projects organise capital work. A top-level project can contain sub-projects, while a project without children can hold WIP assets. A WIP asset holds the costs relating to an intended asset or improvement.
Plan the structure before adding records. The interface offers Add Sub-Project for a top-level project without WIP assets. It offers Add WIP Asset for an in-progress project without child projects. A project budget is a planning amount; entering it does not record a capital cost.
6.2 Add a project (via interface)
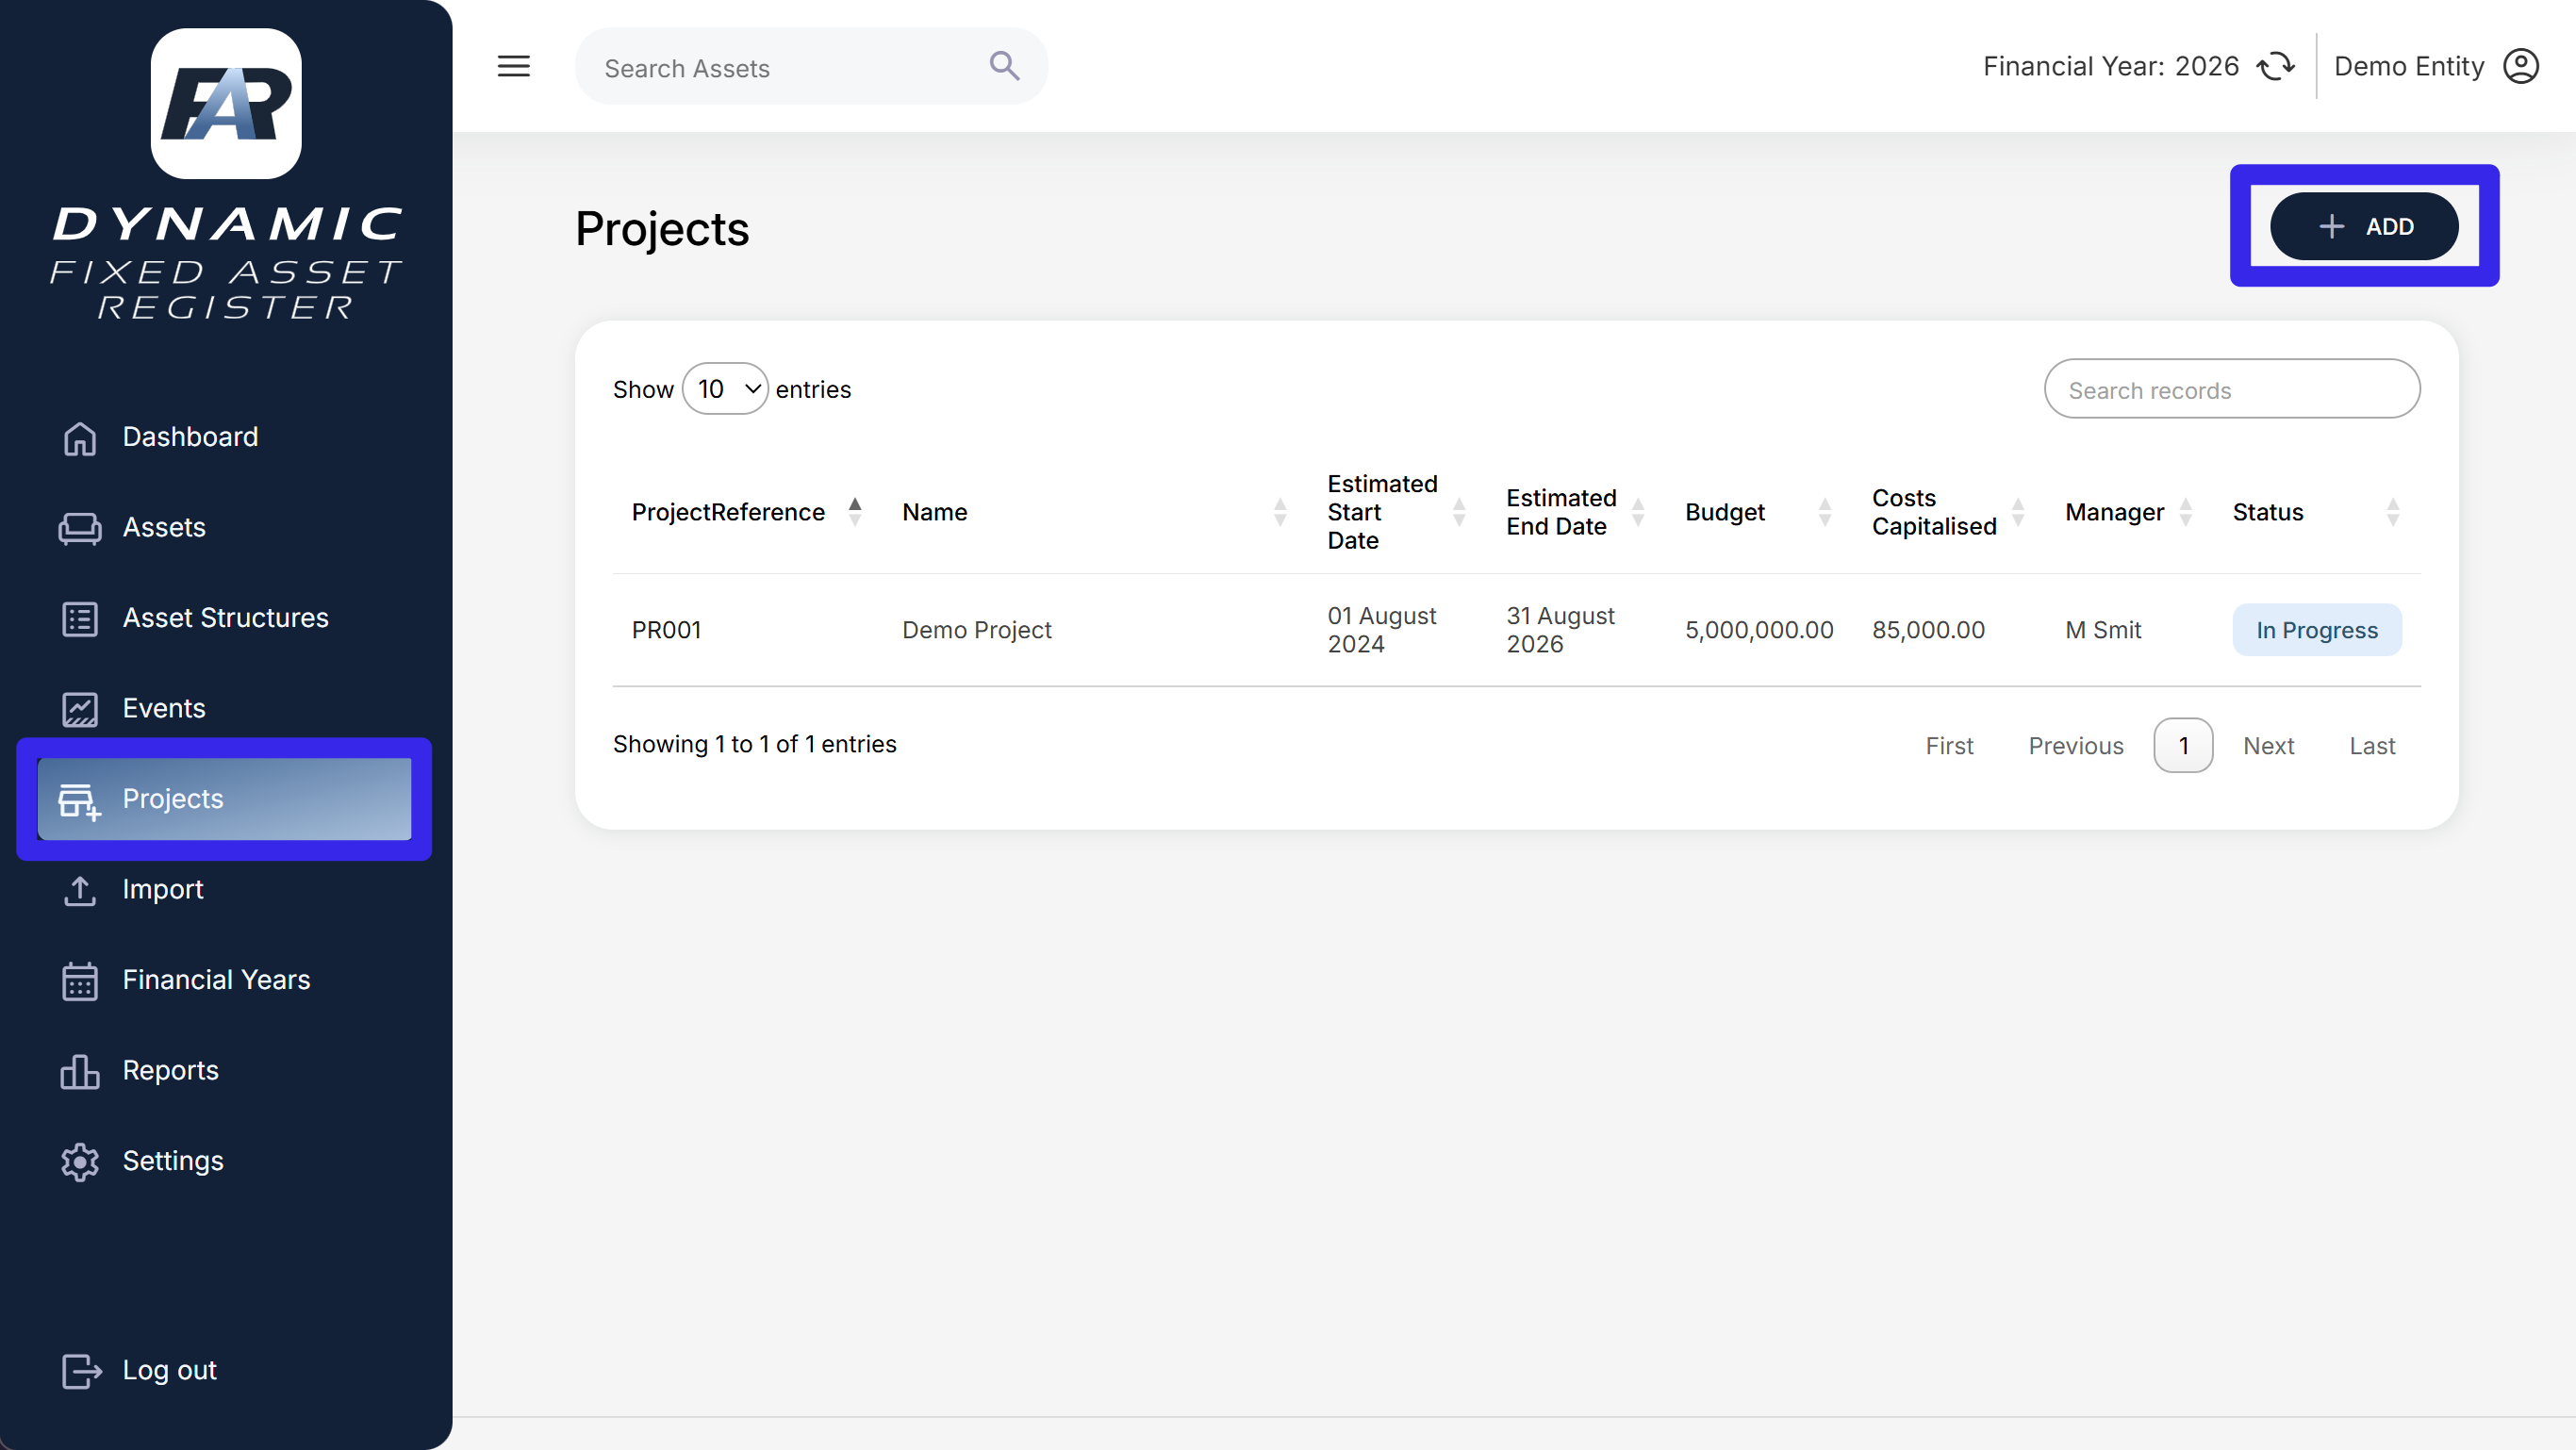
Navigation: Projects > Add.
-
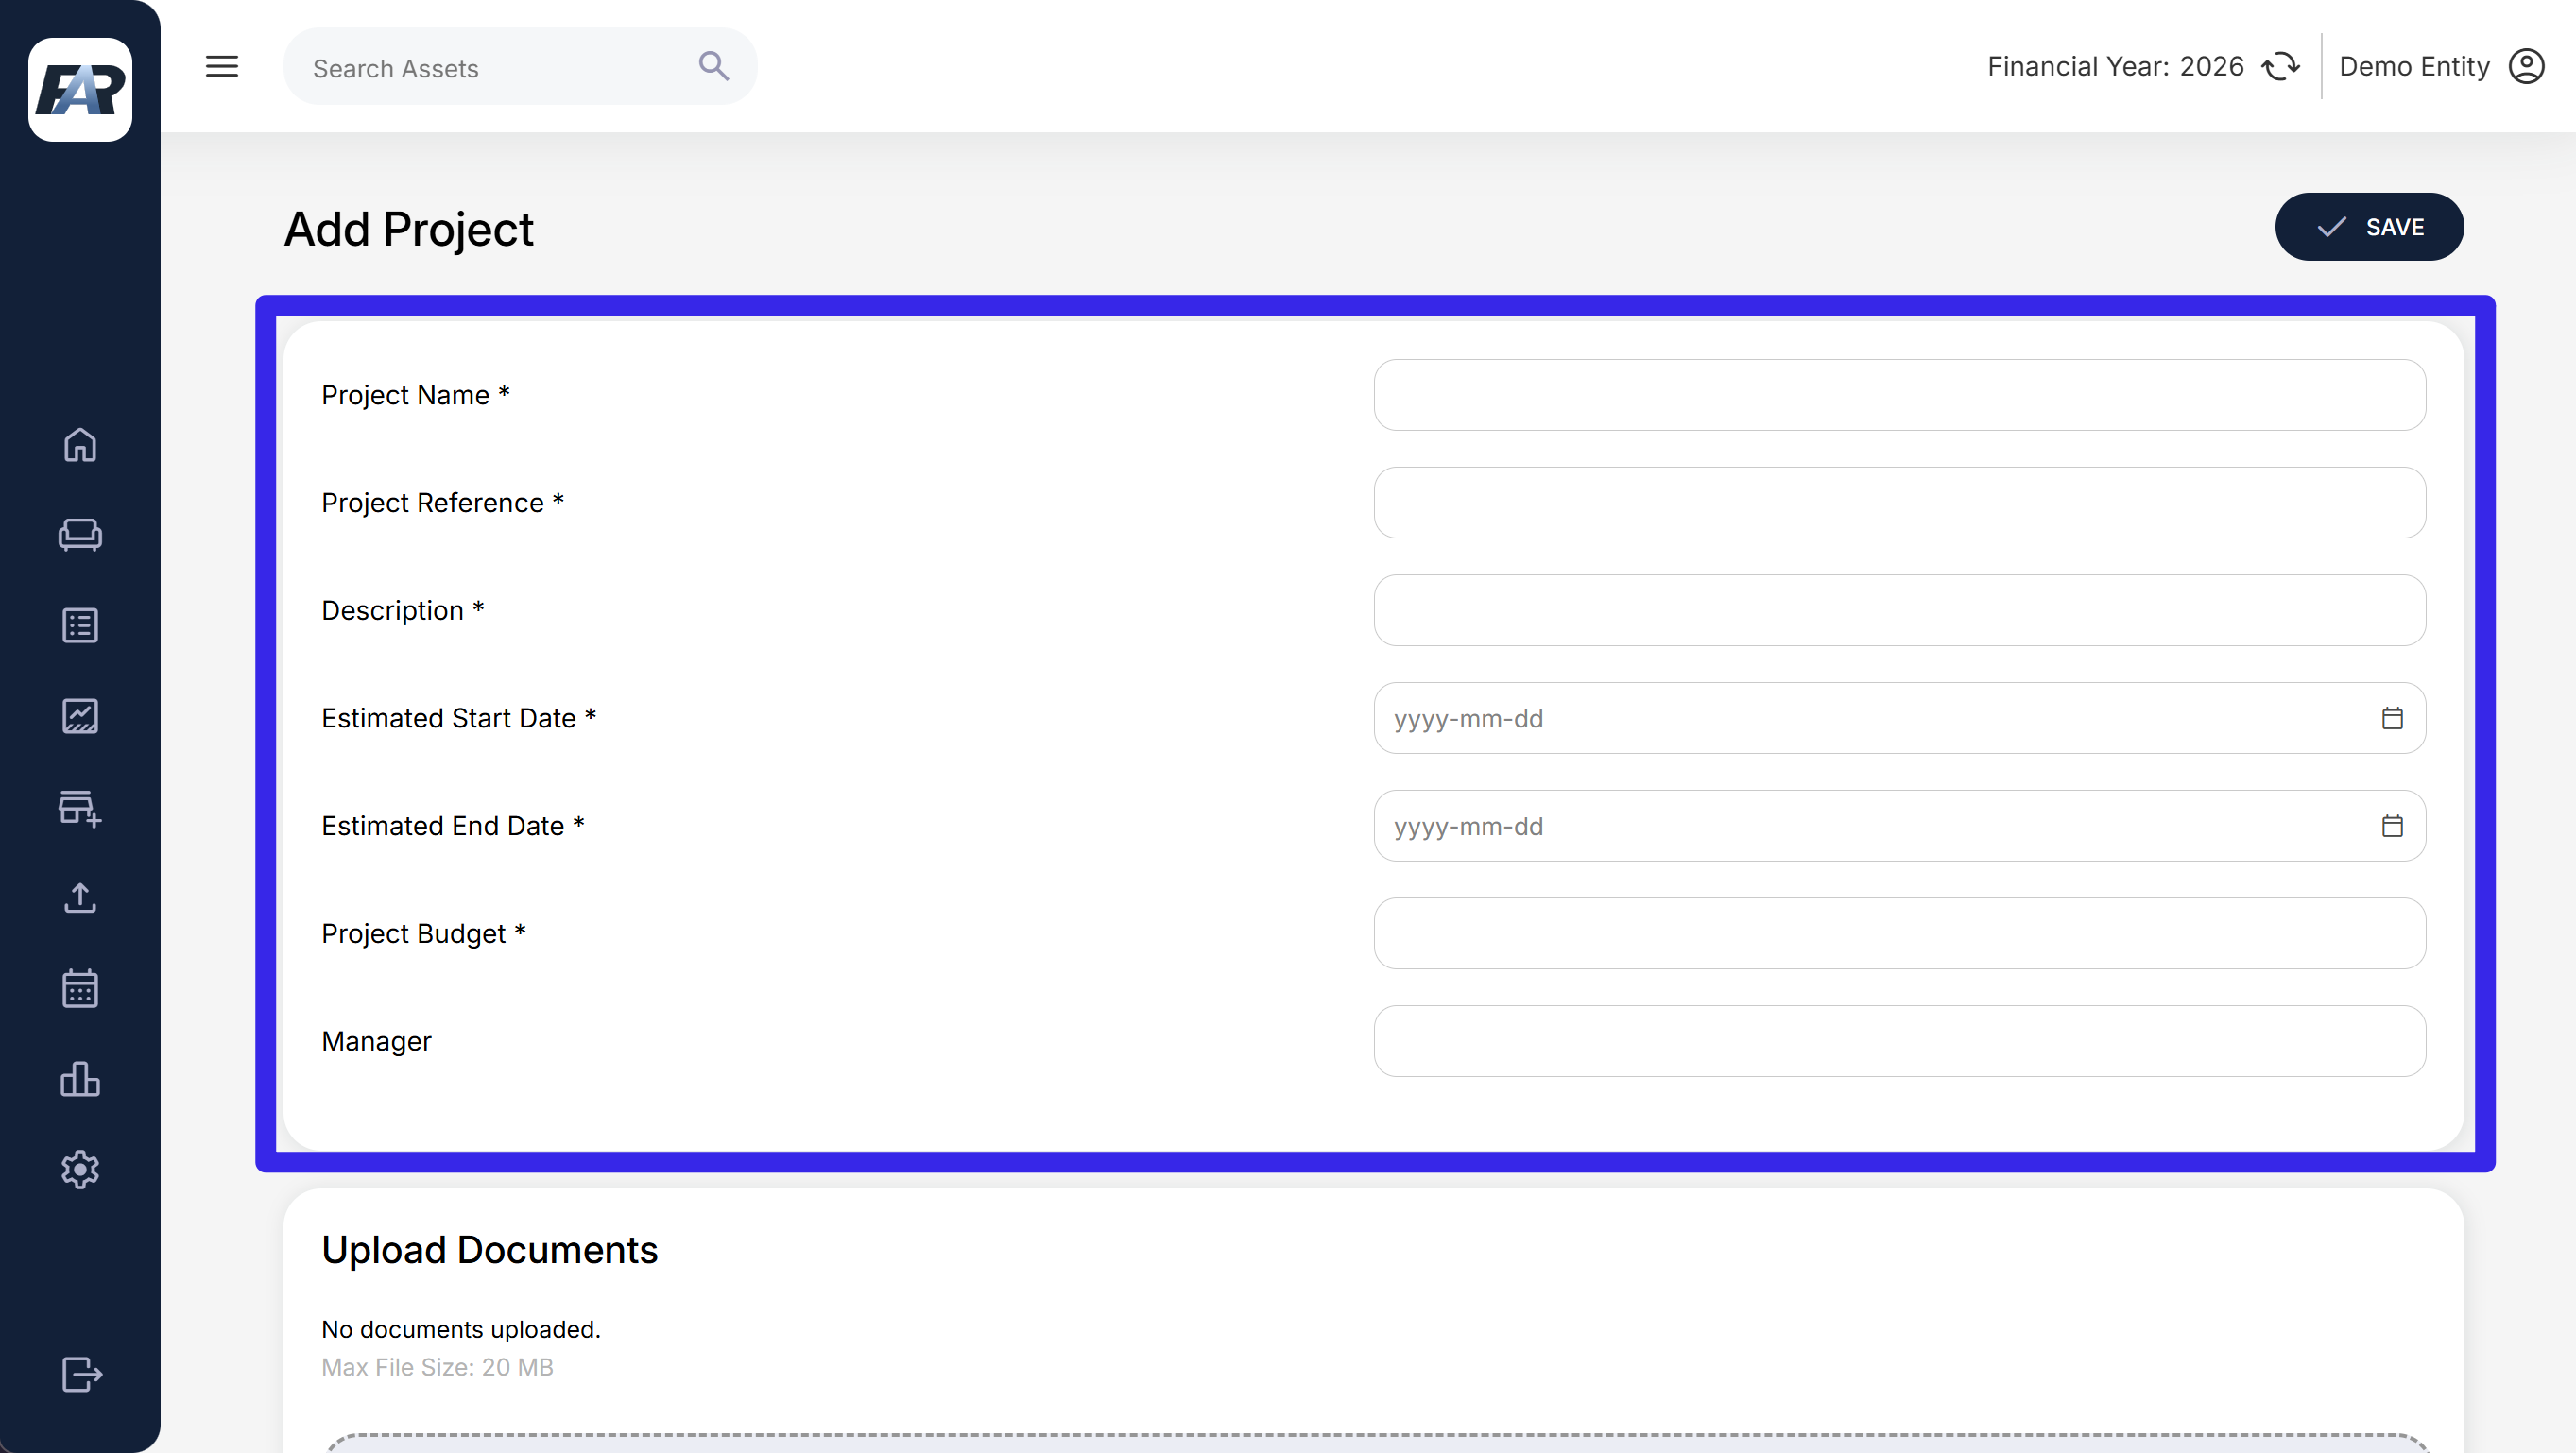
Enter Project Name, Project Reference and Description.
-
Enter Estimated Start Date and Estimated End Date.
-
Enter Project Budget and the manager, where applicable.
-
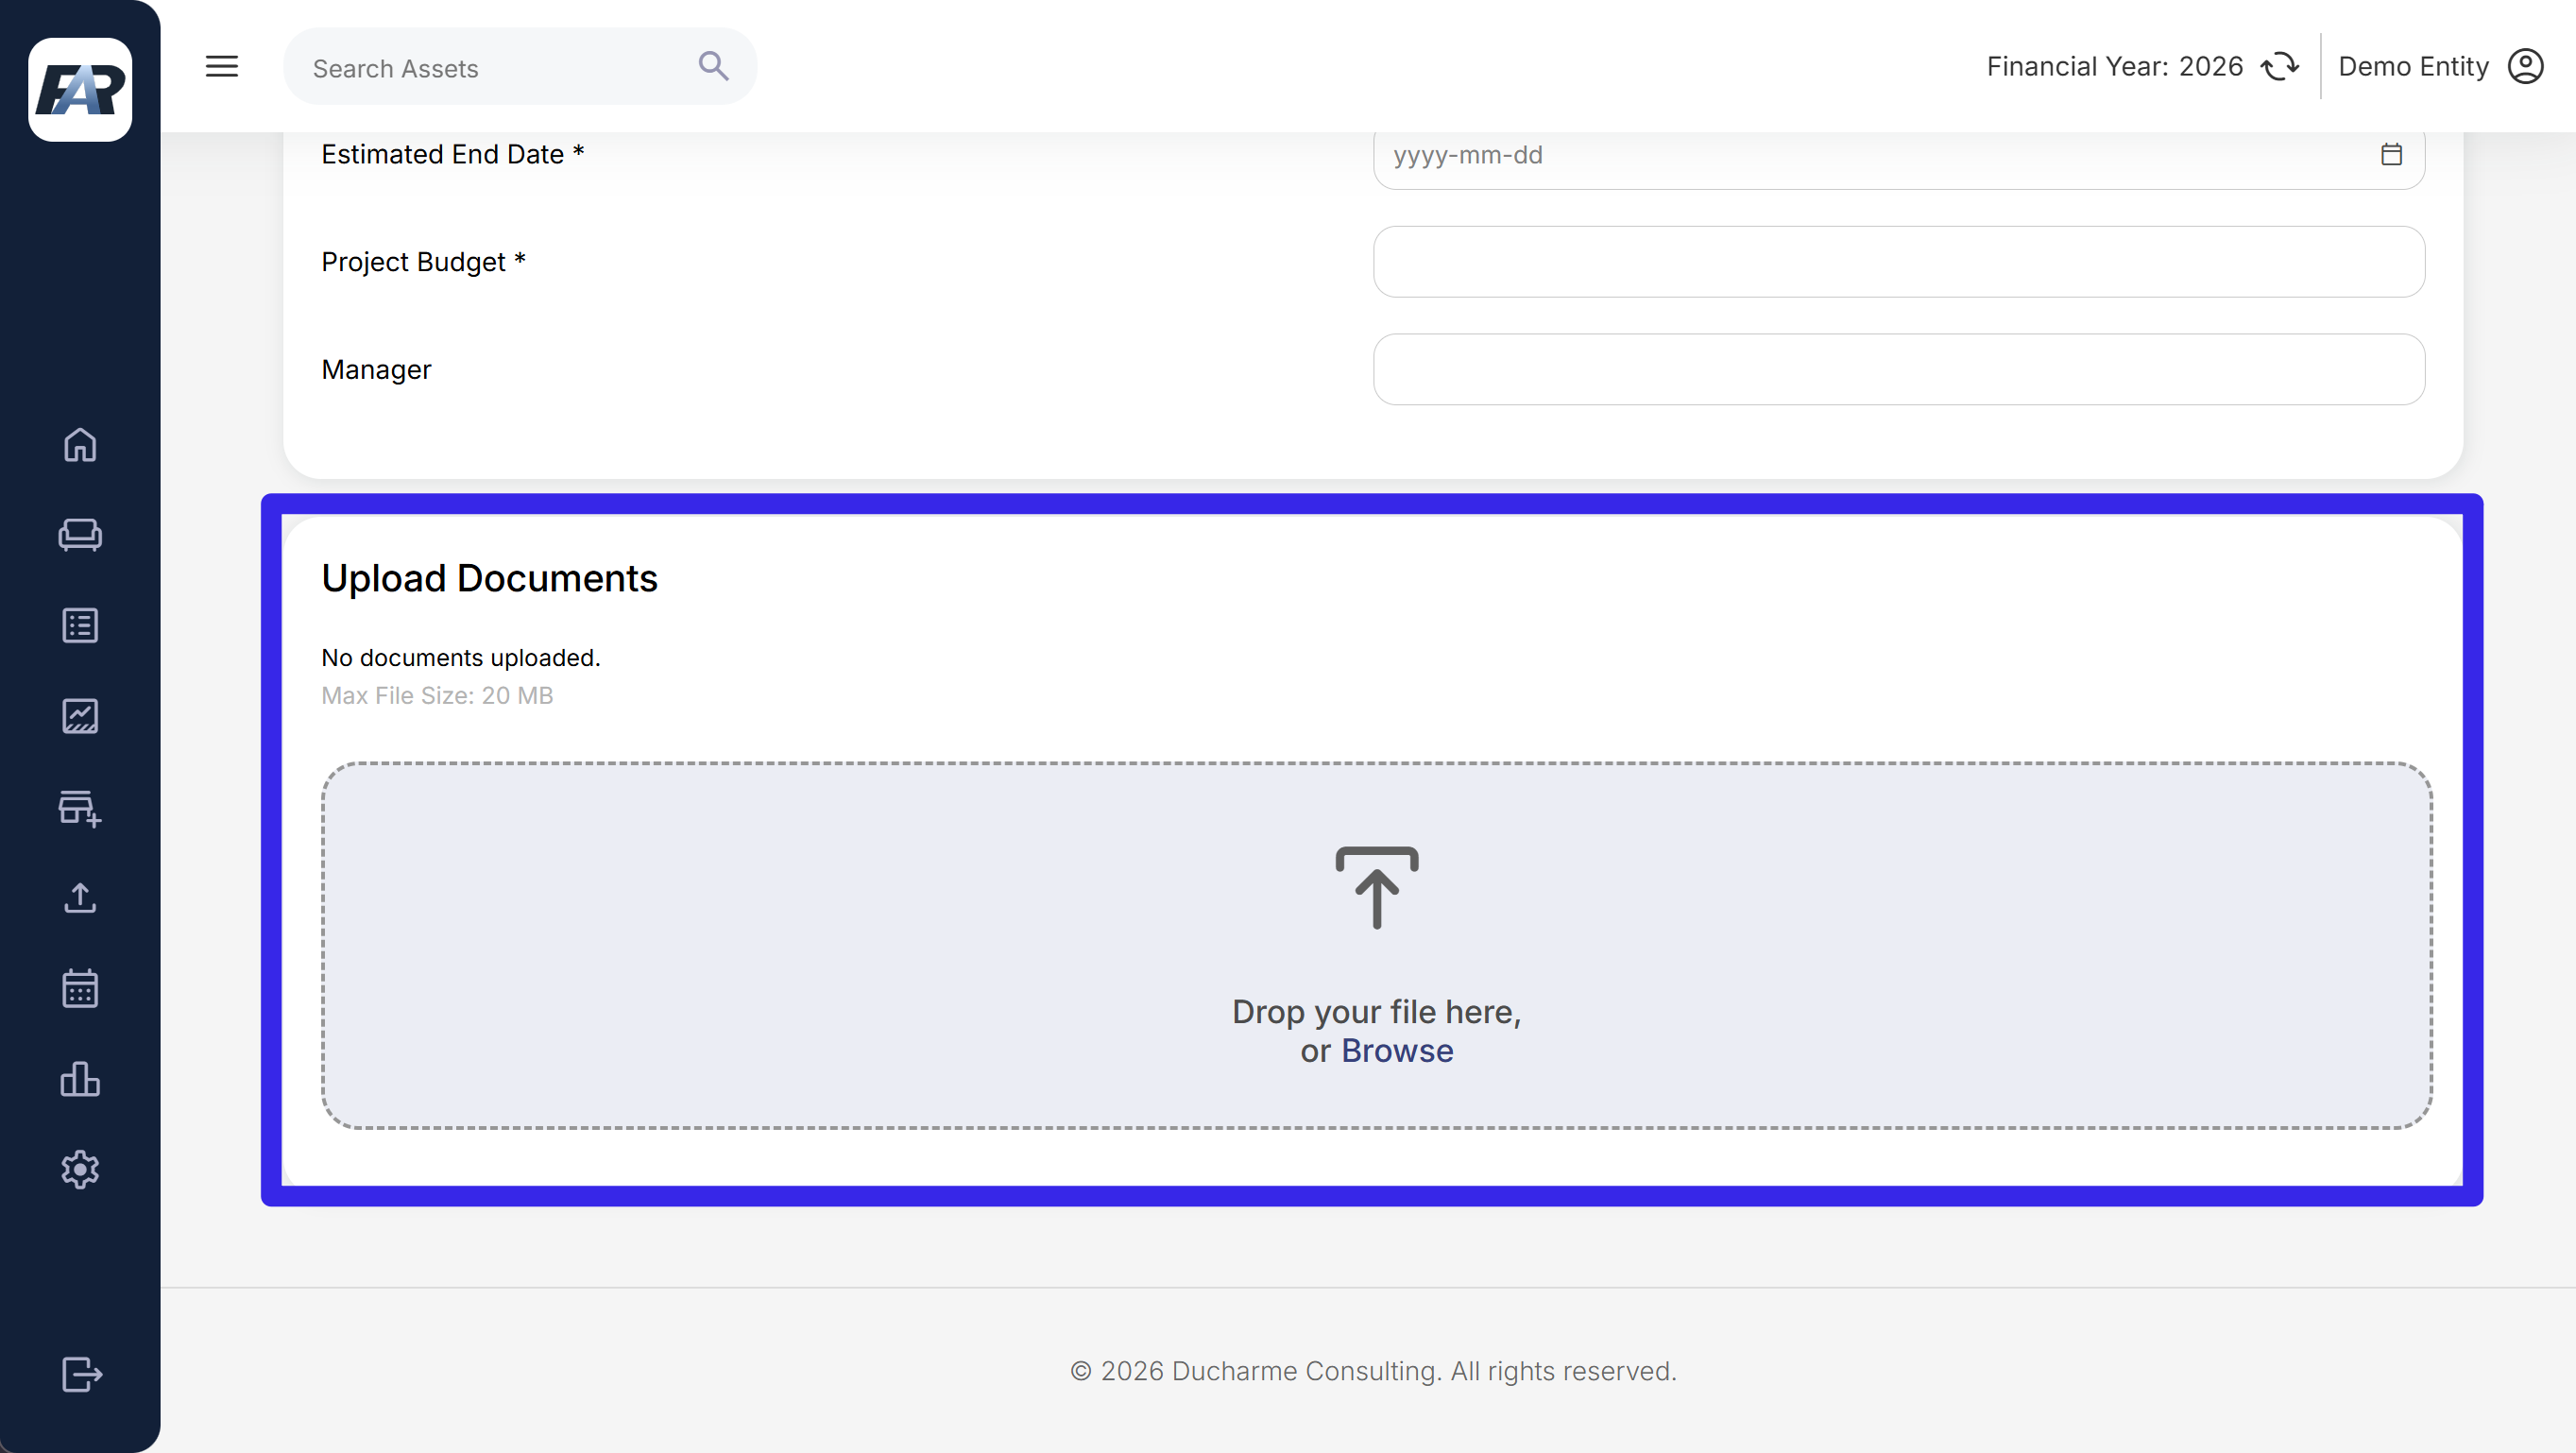
Attach project evidence where the upload panel is available.
-
Select Save.
-
Open the project and check its reference, dates, budget and In Progress status.
The project reference must be unique within the relevant entity context. Search existing projects before creating a new reference for work that may already be registered.
6.3 Import projects (via importer)
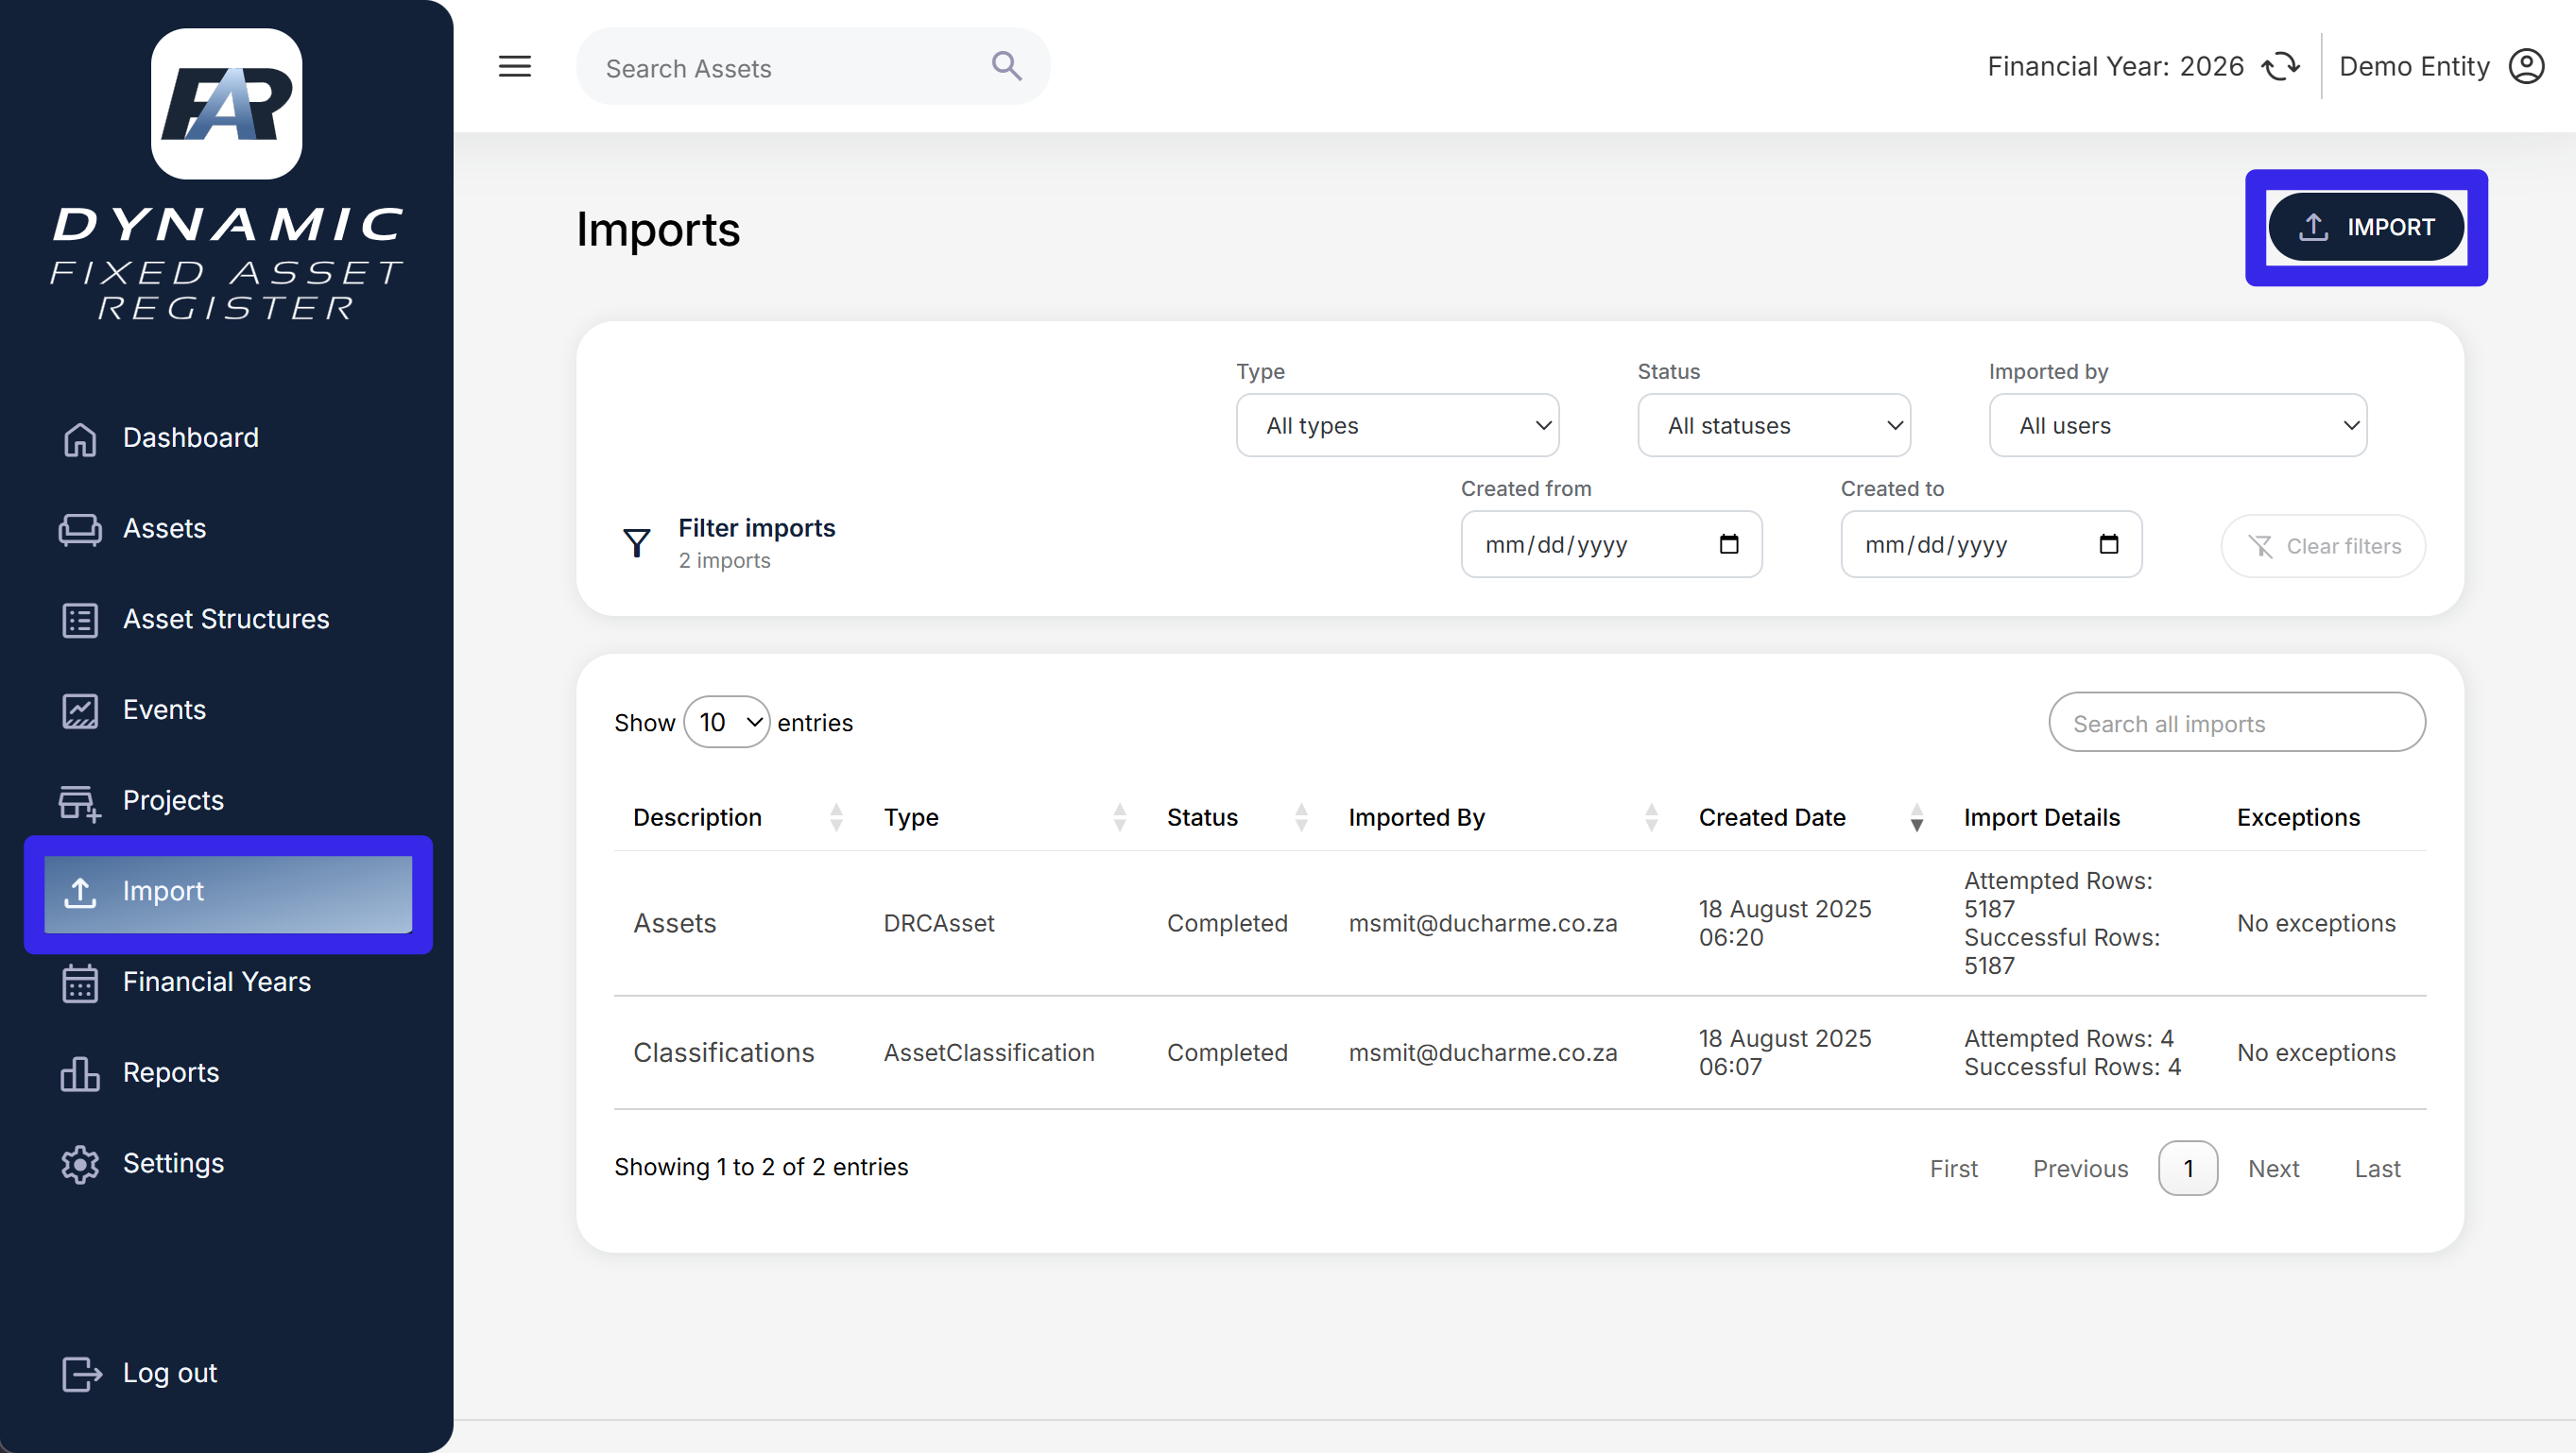
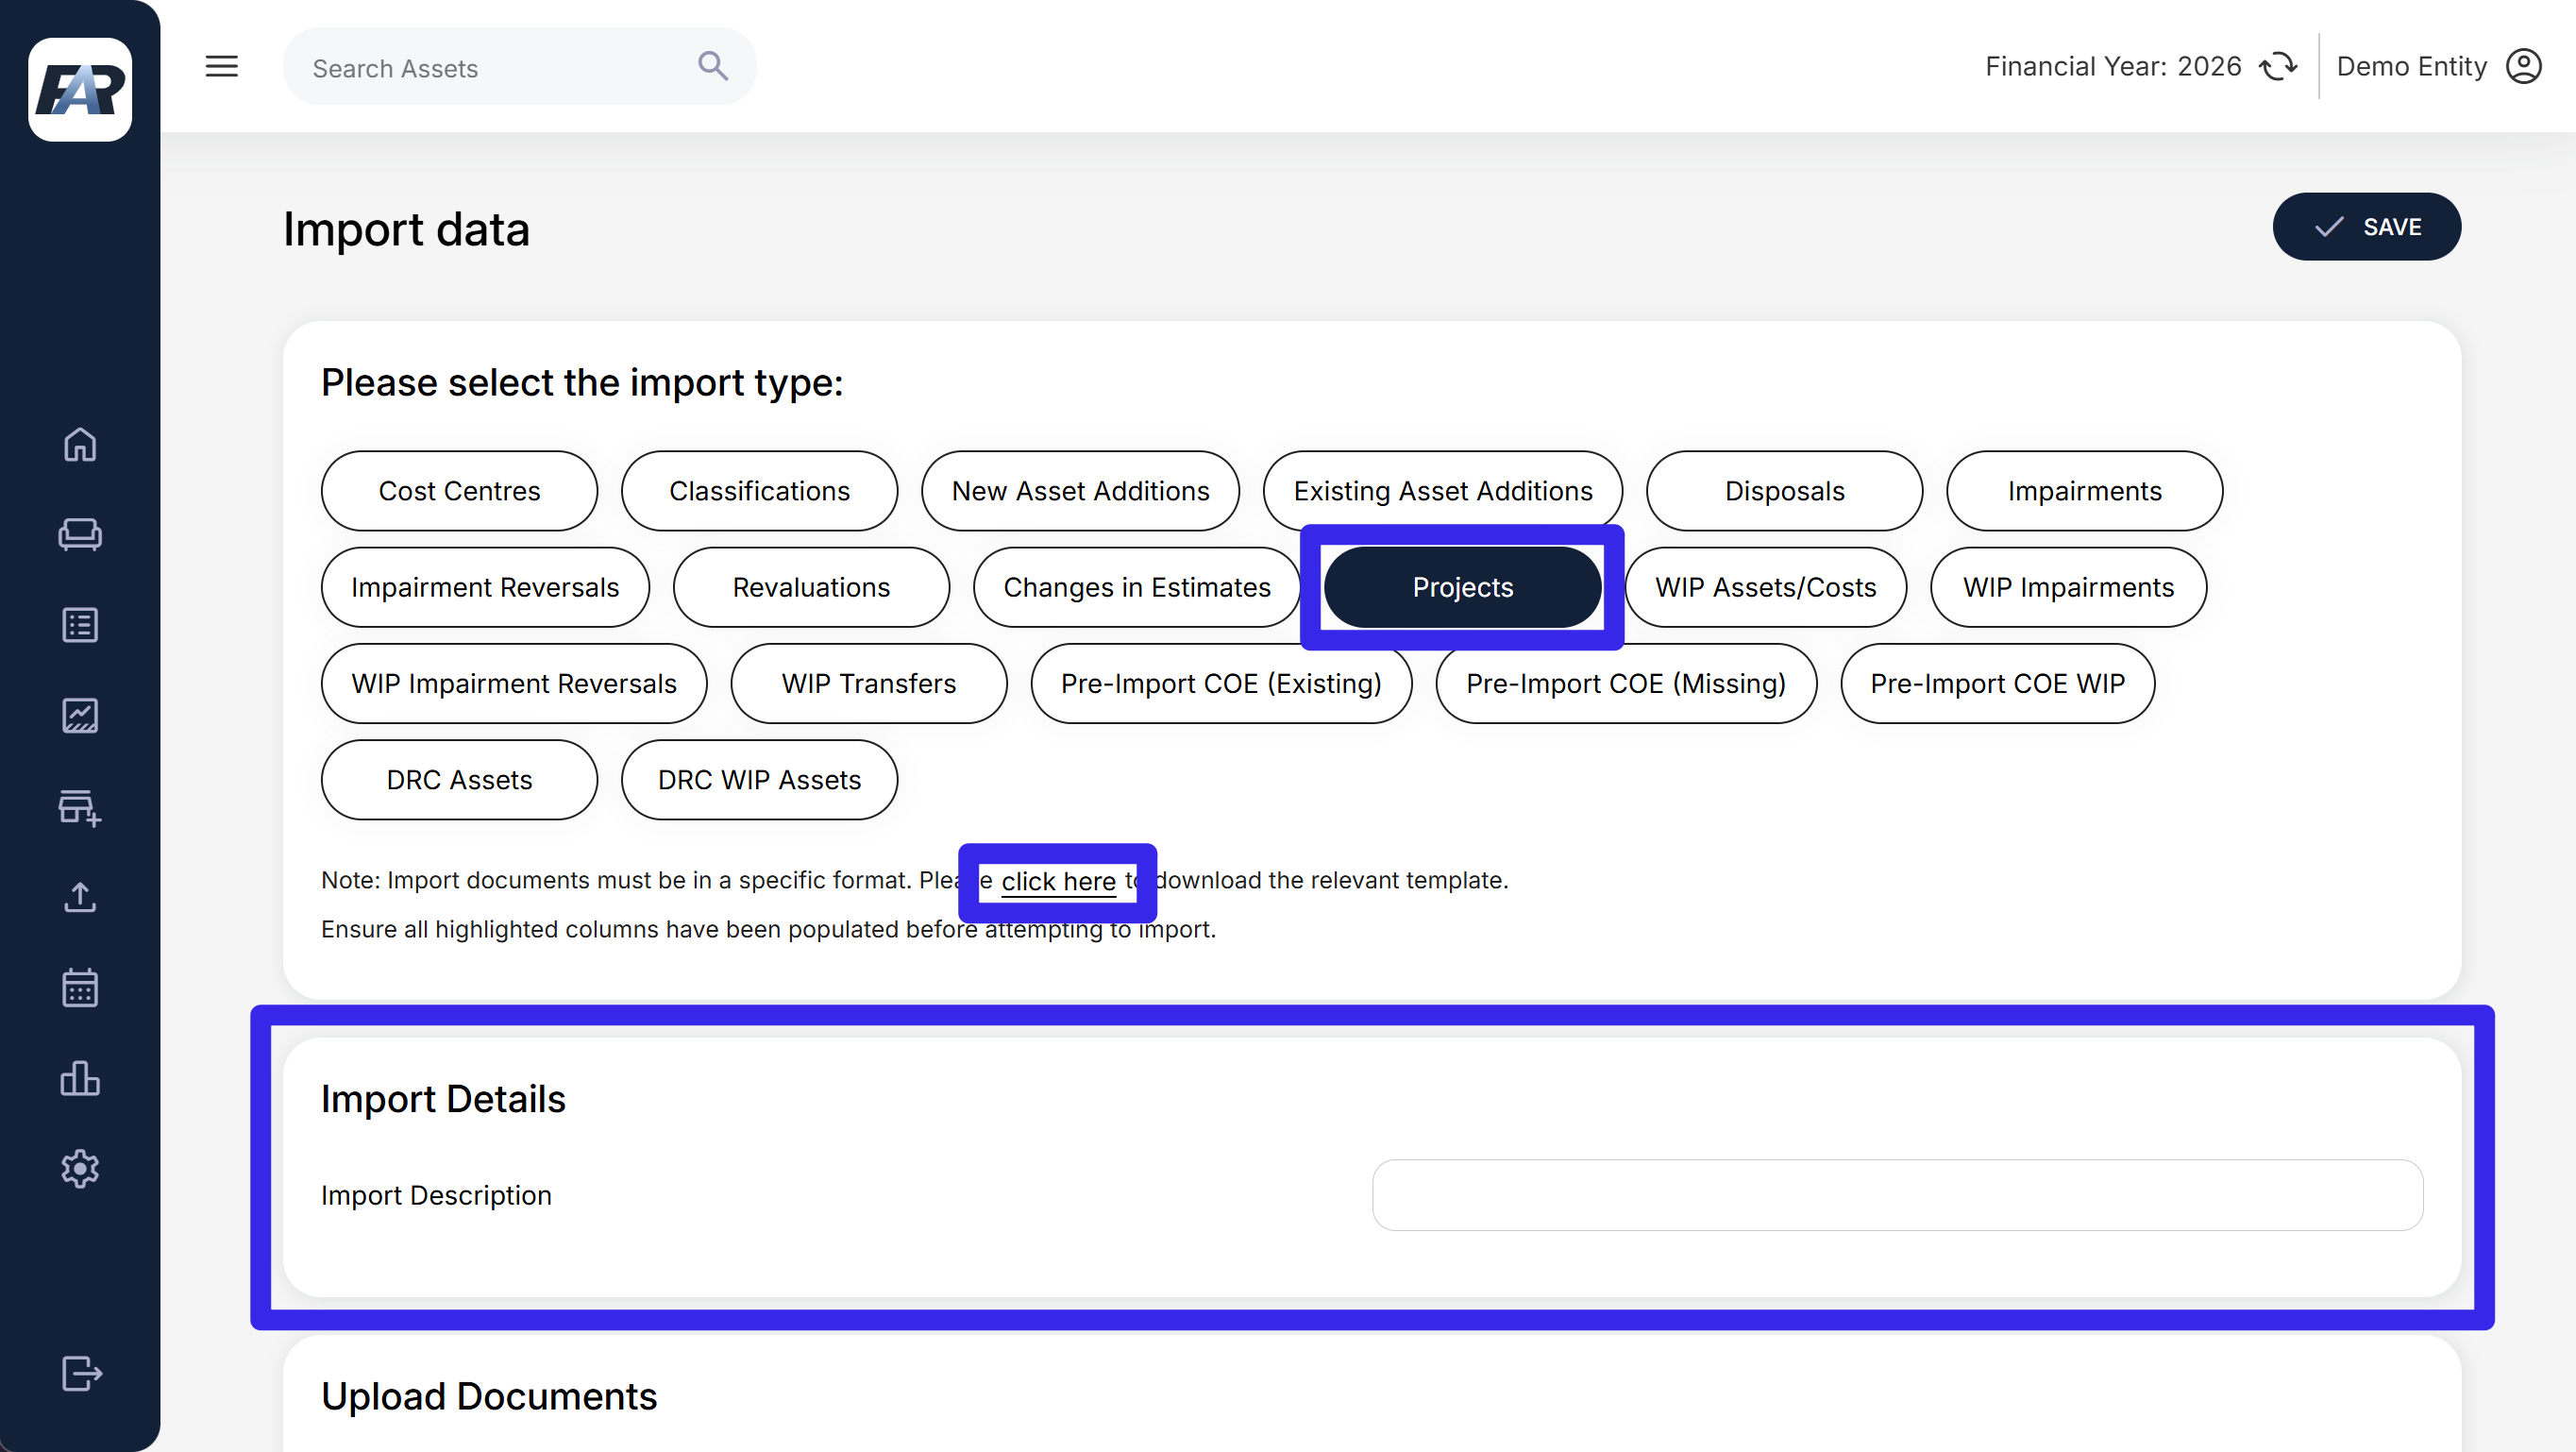
Navigation: Import > Import.
-
Choose “Projects” as the import type.
-
To download the relevant template, use the “click here” button.
-
Provide an import description that is relevant to the data being imported, e.g. “New projects for 2026”.
-
Once the template has been downloaded, enter with data to be imported. Ensure at least the required (highlighted) columns have been populated:
-
Parent Project Name (not required). This is a pre-populated drop-down menu of existing projects on the system. Only existing projects can be chosen as a parent project.
-
New Project Reference Number (required). The project reference must be unique within the relevant entity context. Search existing projects before creating new references for work that may already be registered.
-
New Project Name (required)
-
New Project Description (required)
-
Estimated Start Date (required)
-
Estimated End Date (required)
-
Manager (not required)
-
Budget (not required)
-
-
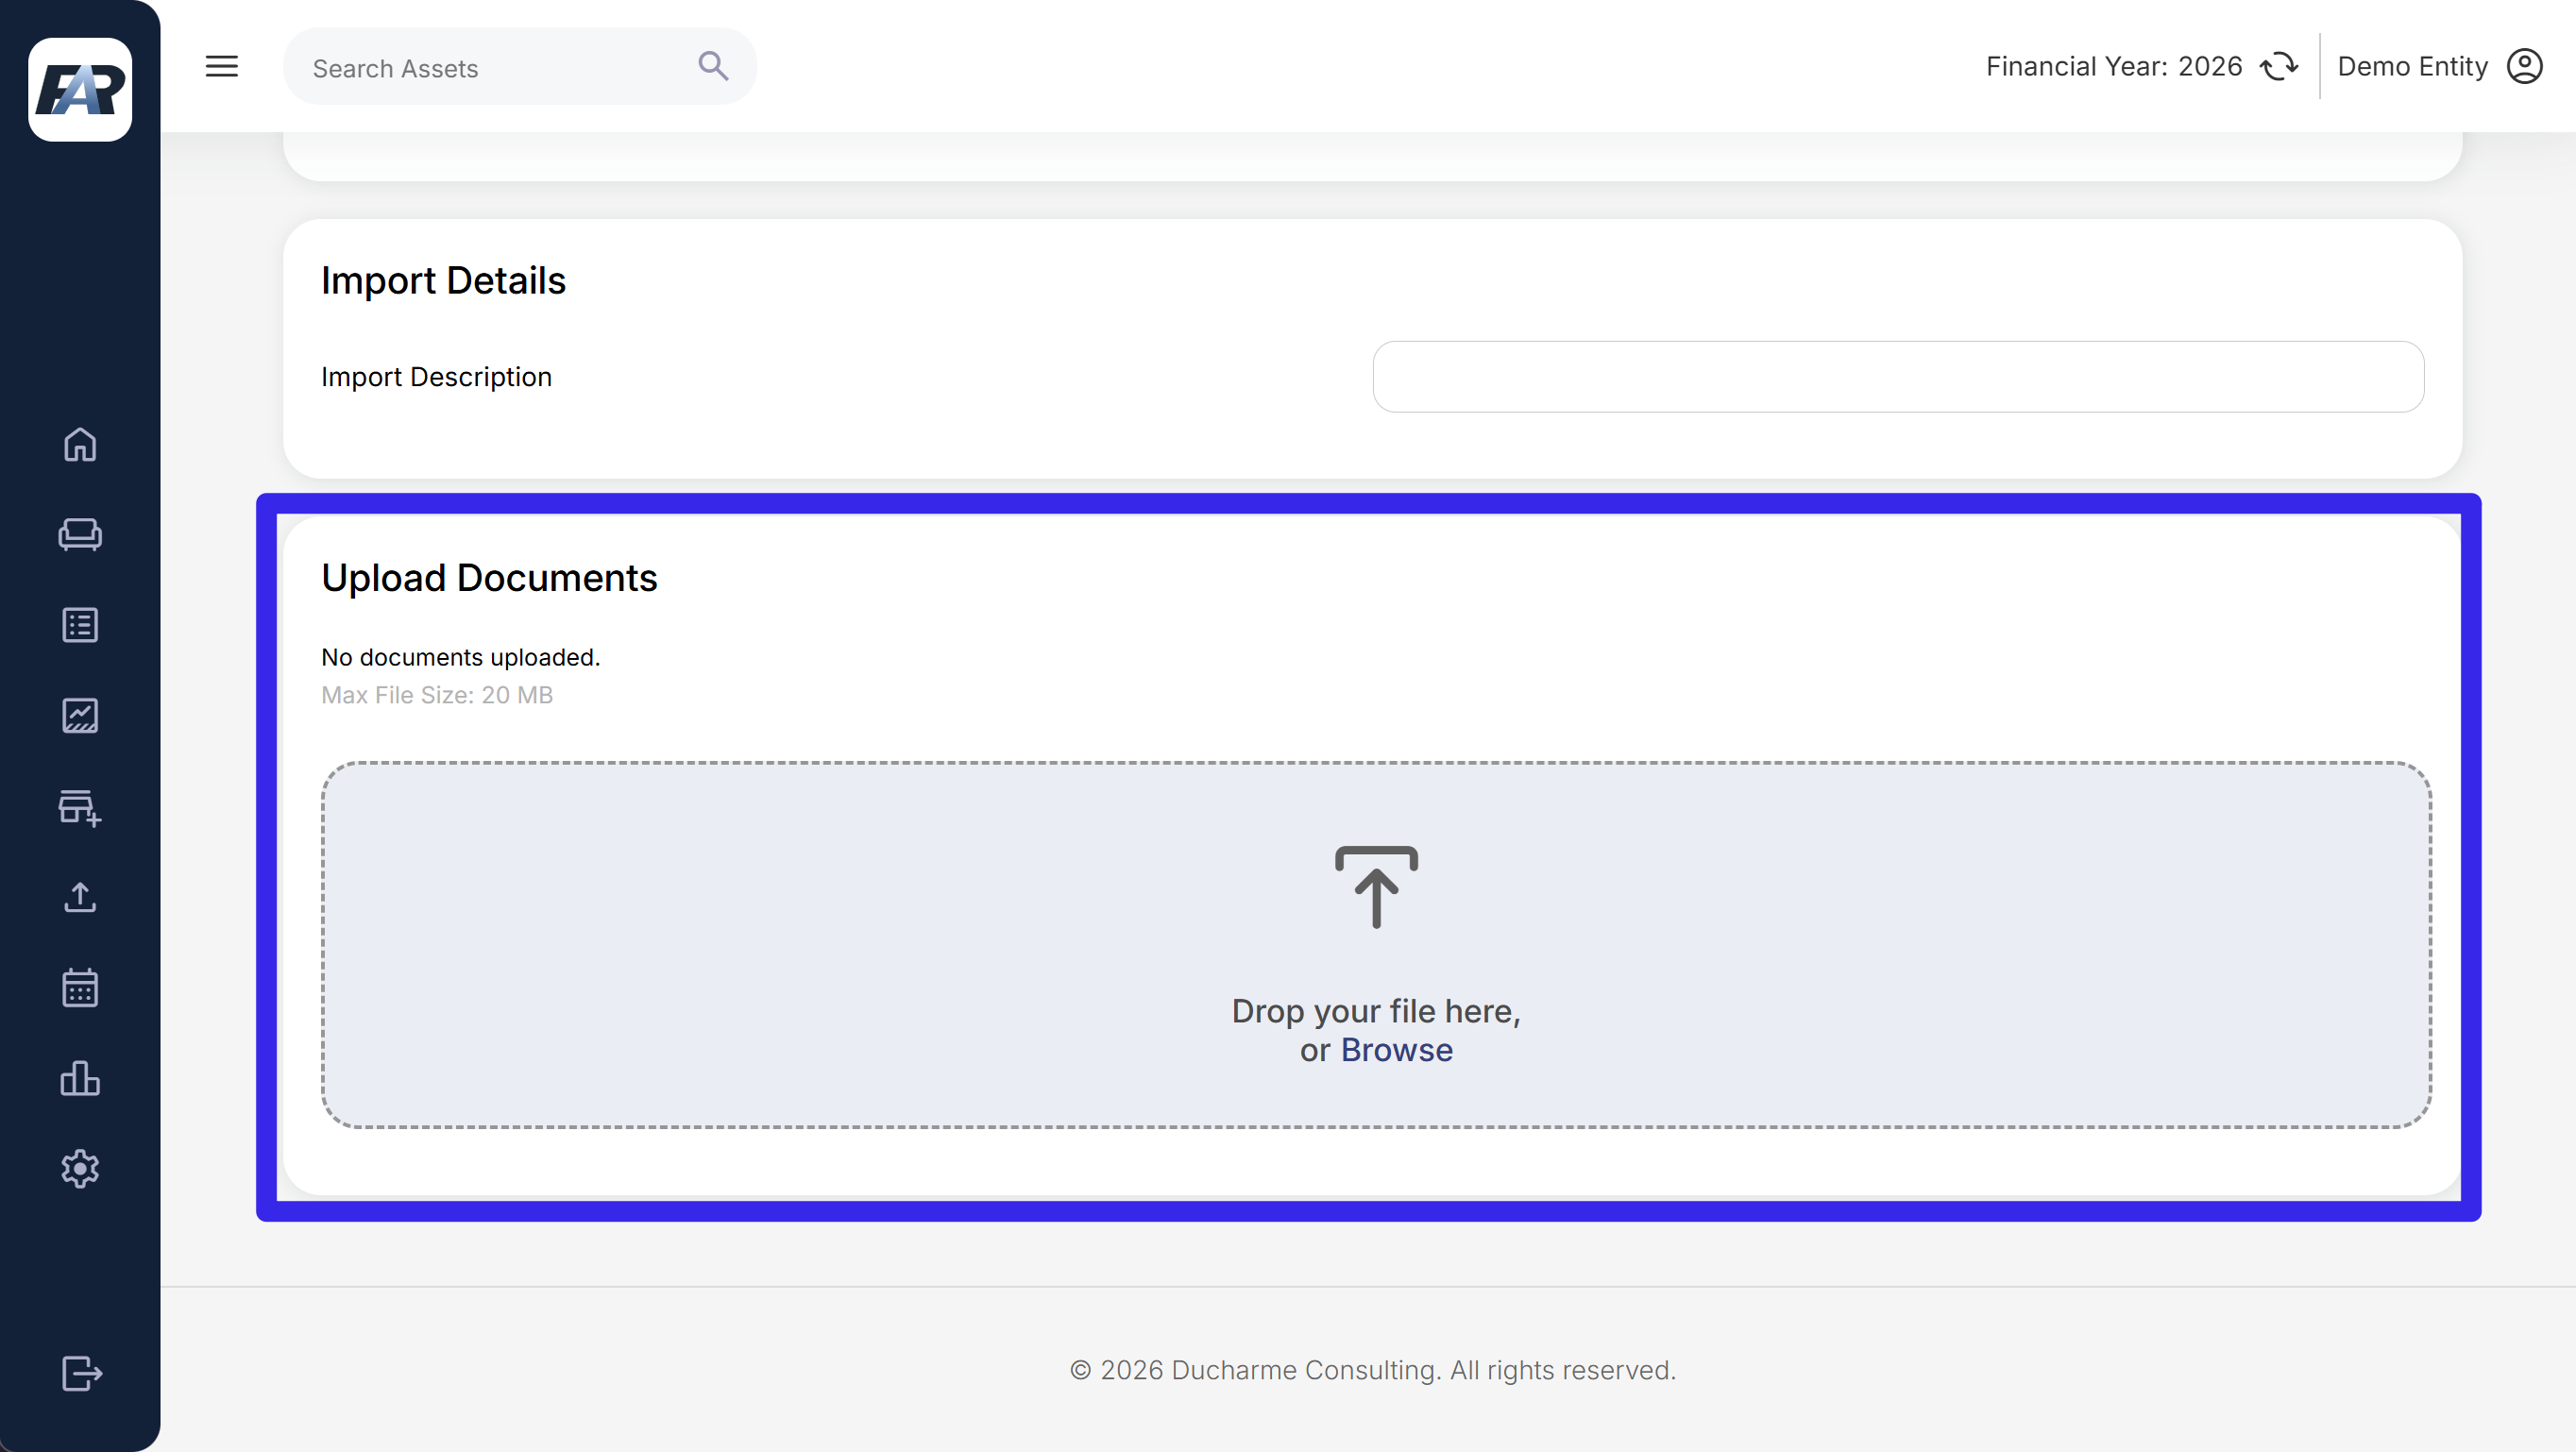
Upload the populated template in the document section of the importer.
-
Click Save.
6.4 (Optional) Add a sub-project and allocate budget
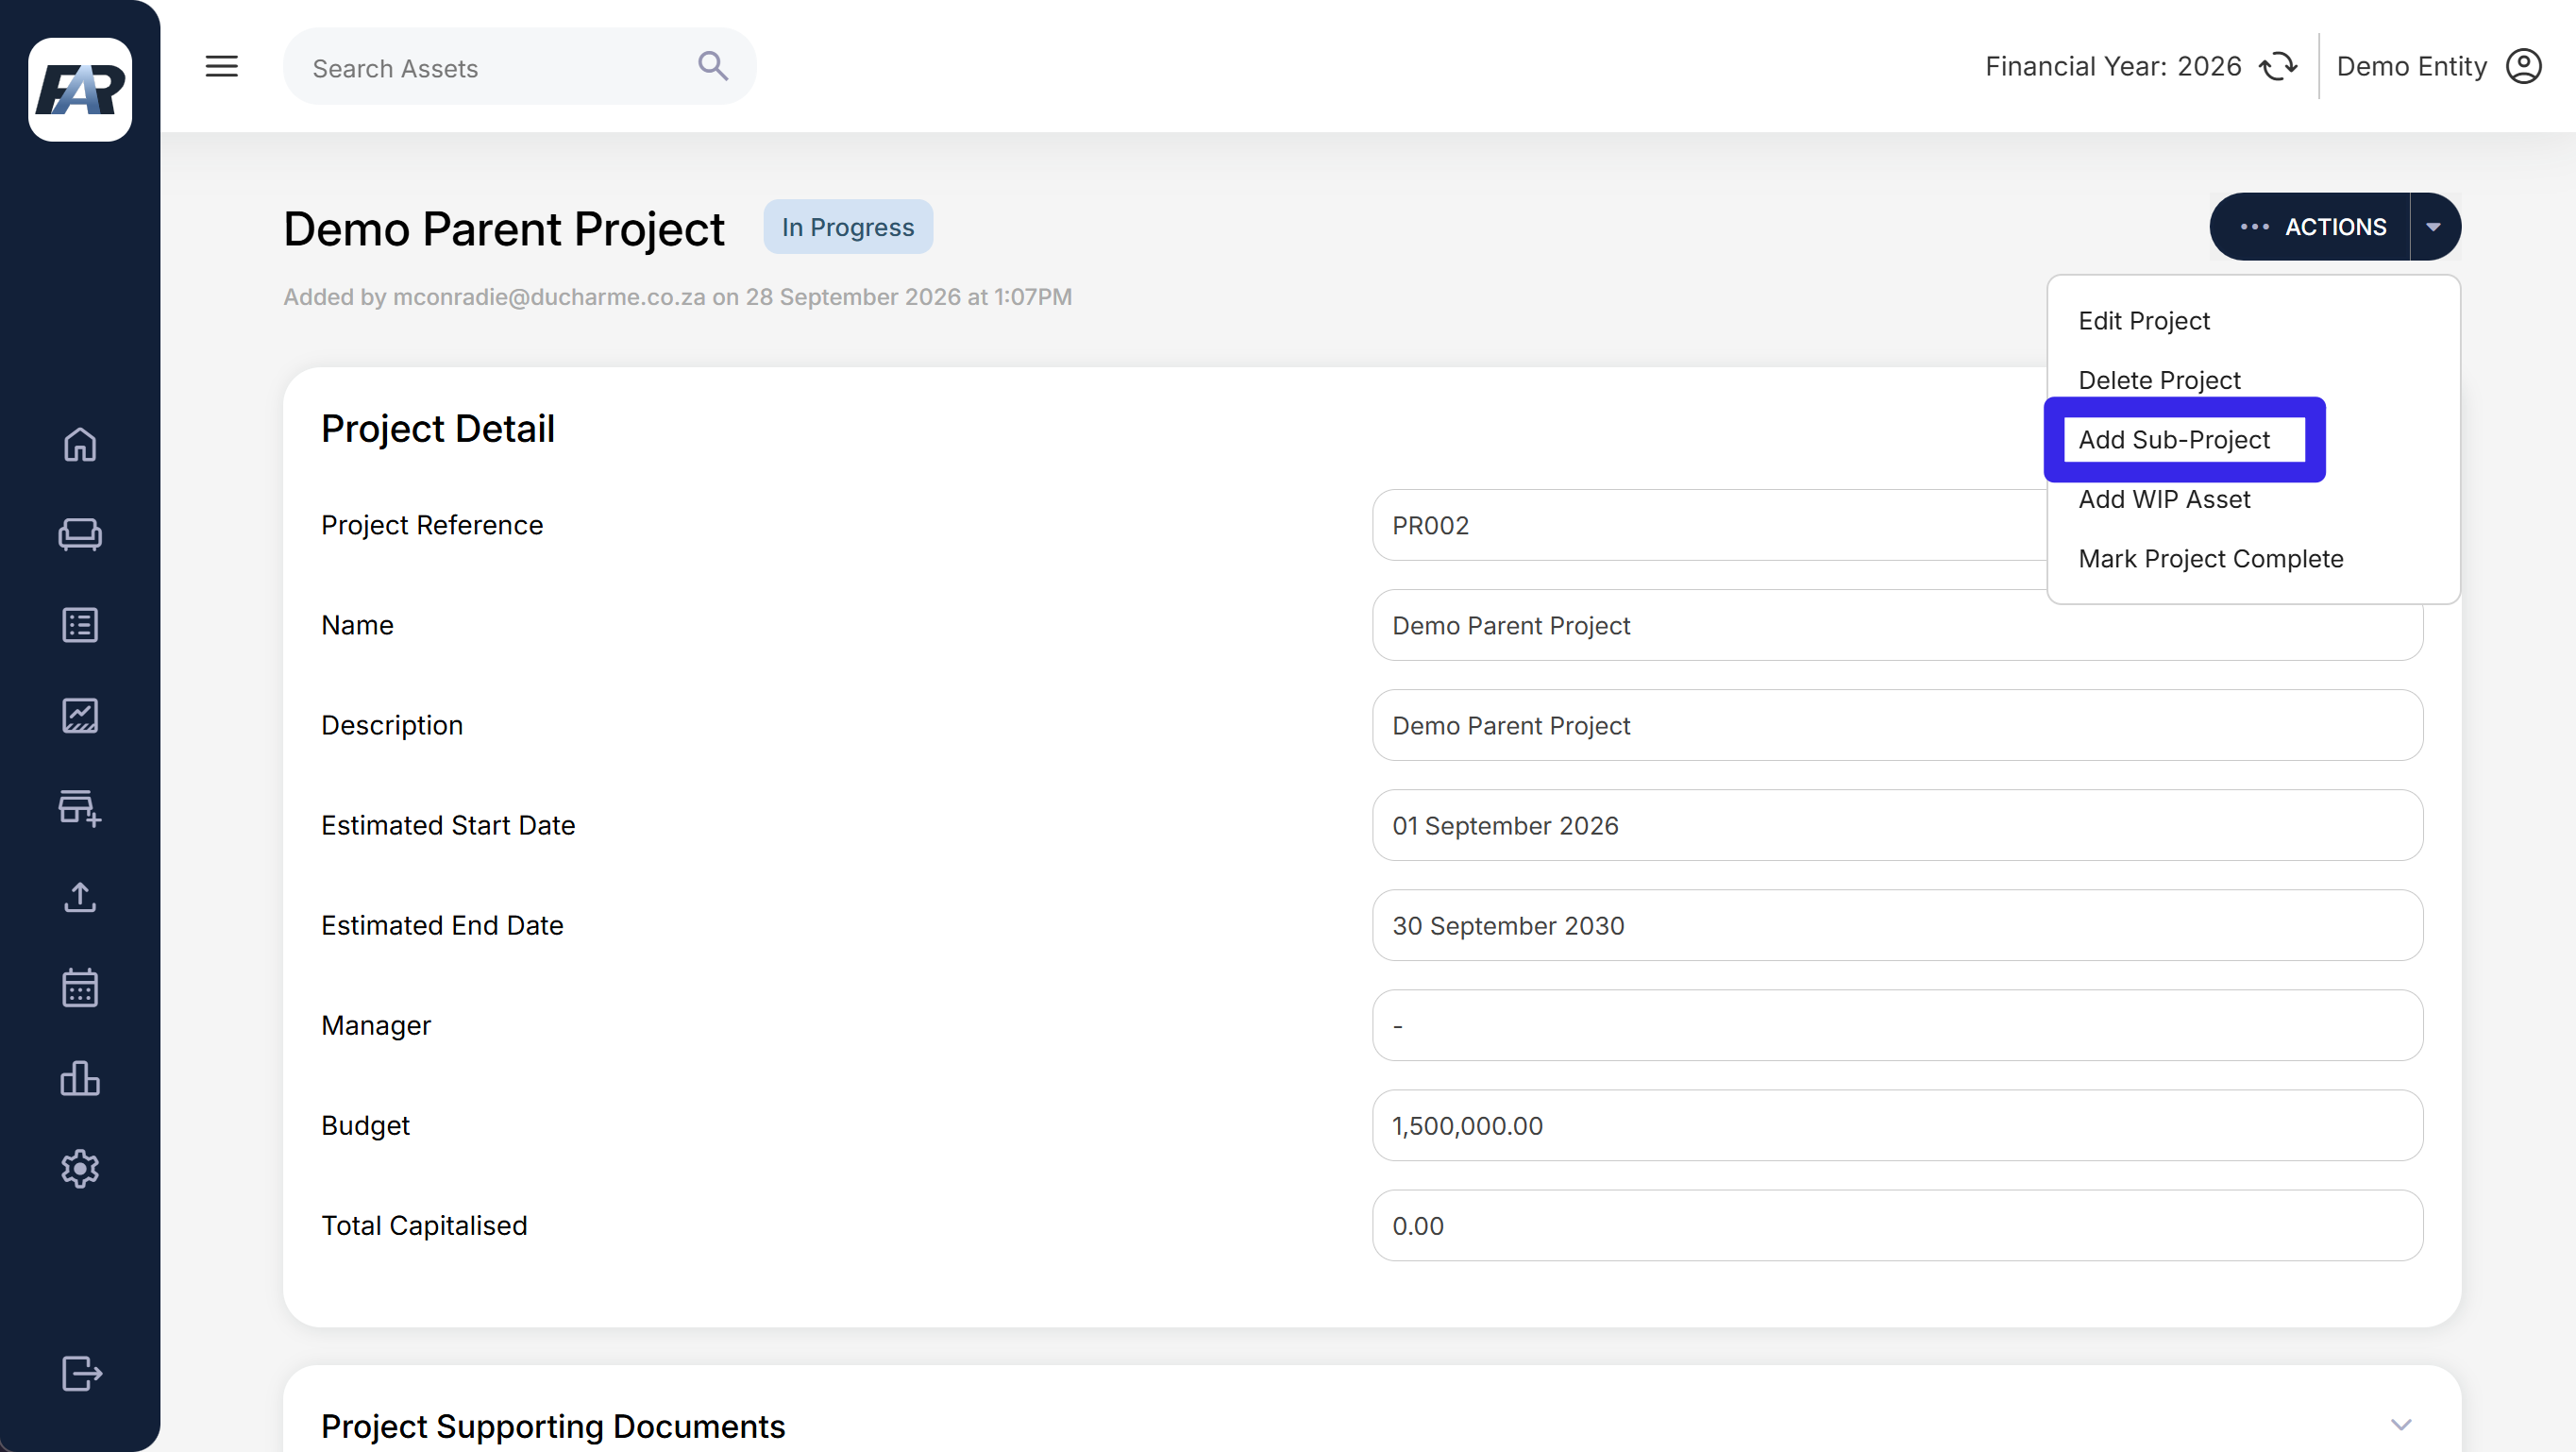
Navigation: Projects > parent project > Actions > Add Sub-Project.
-
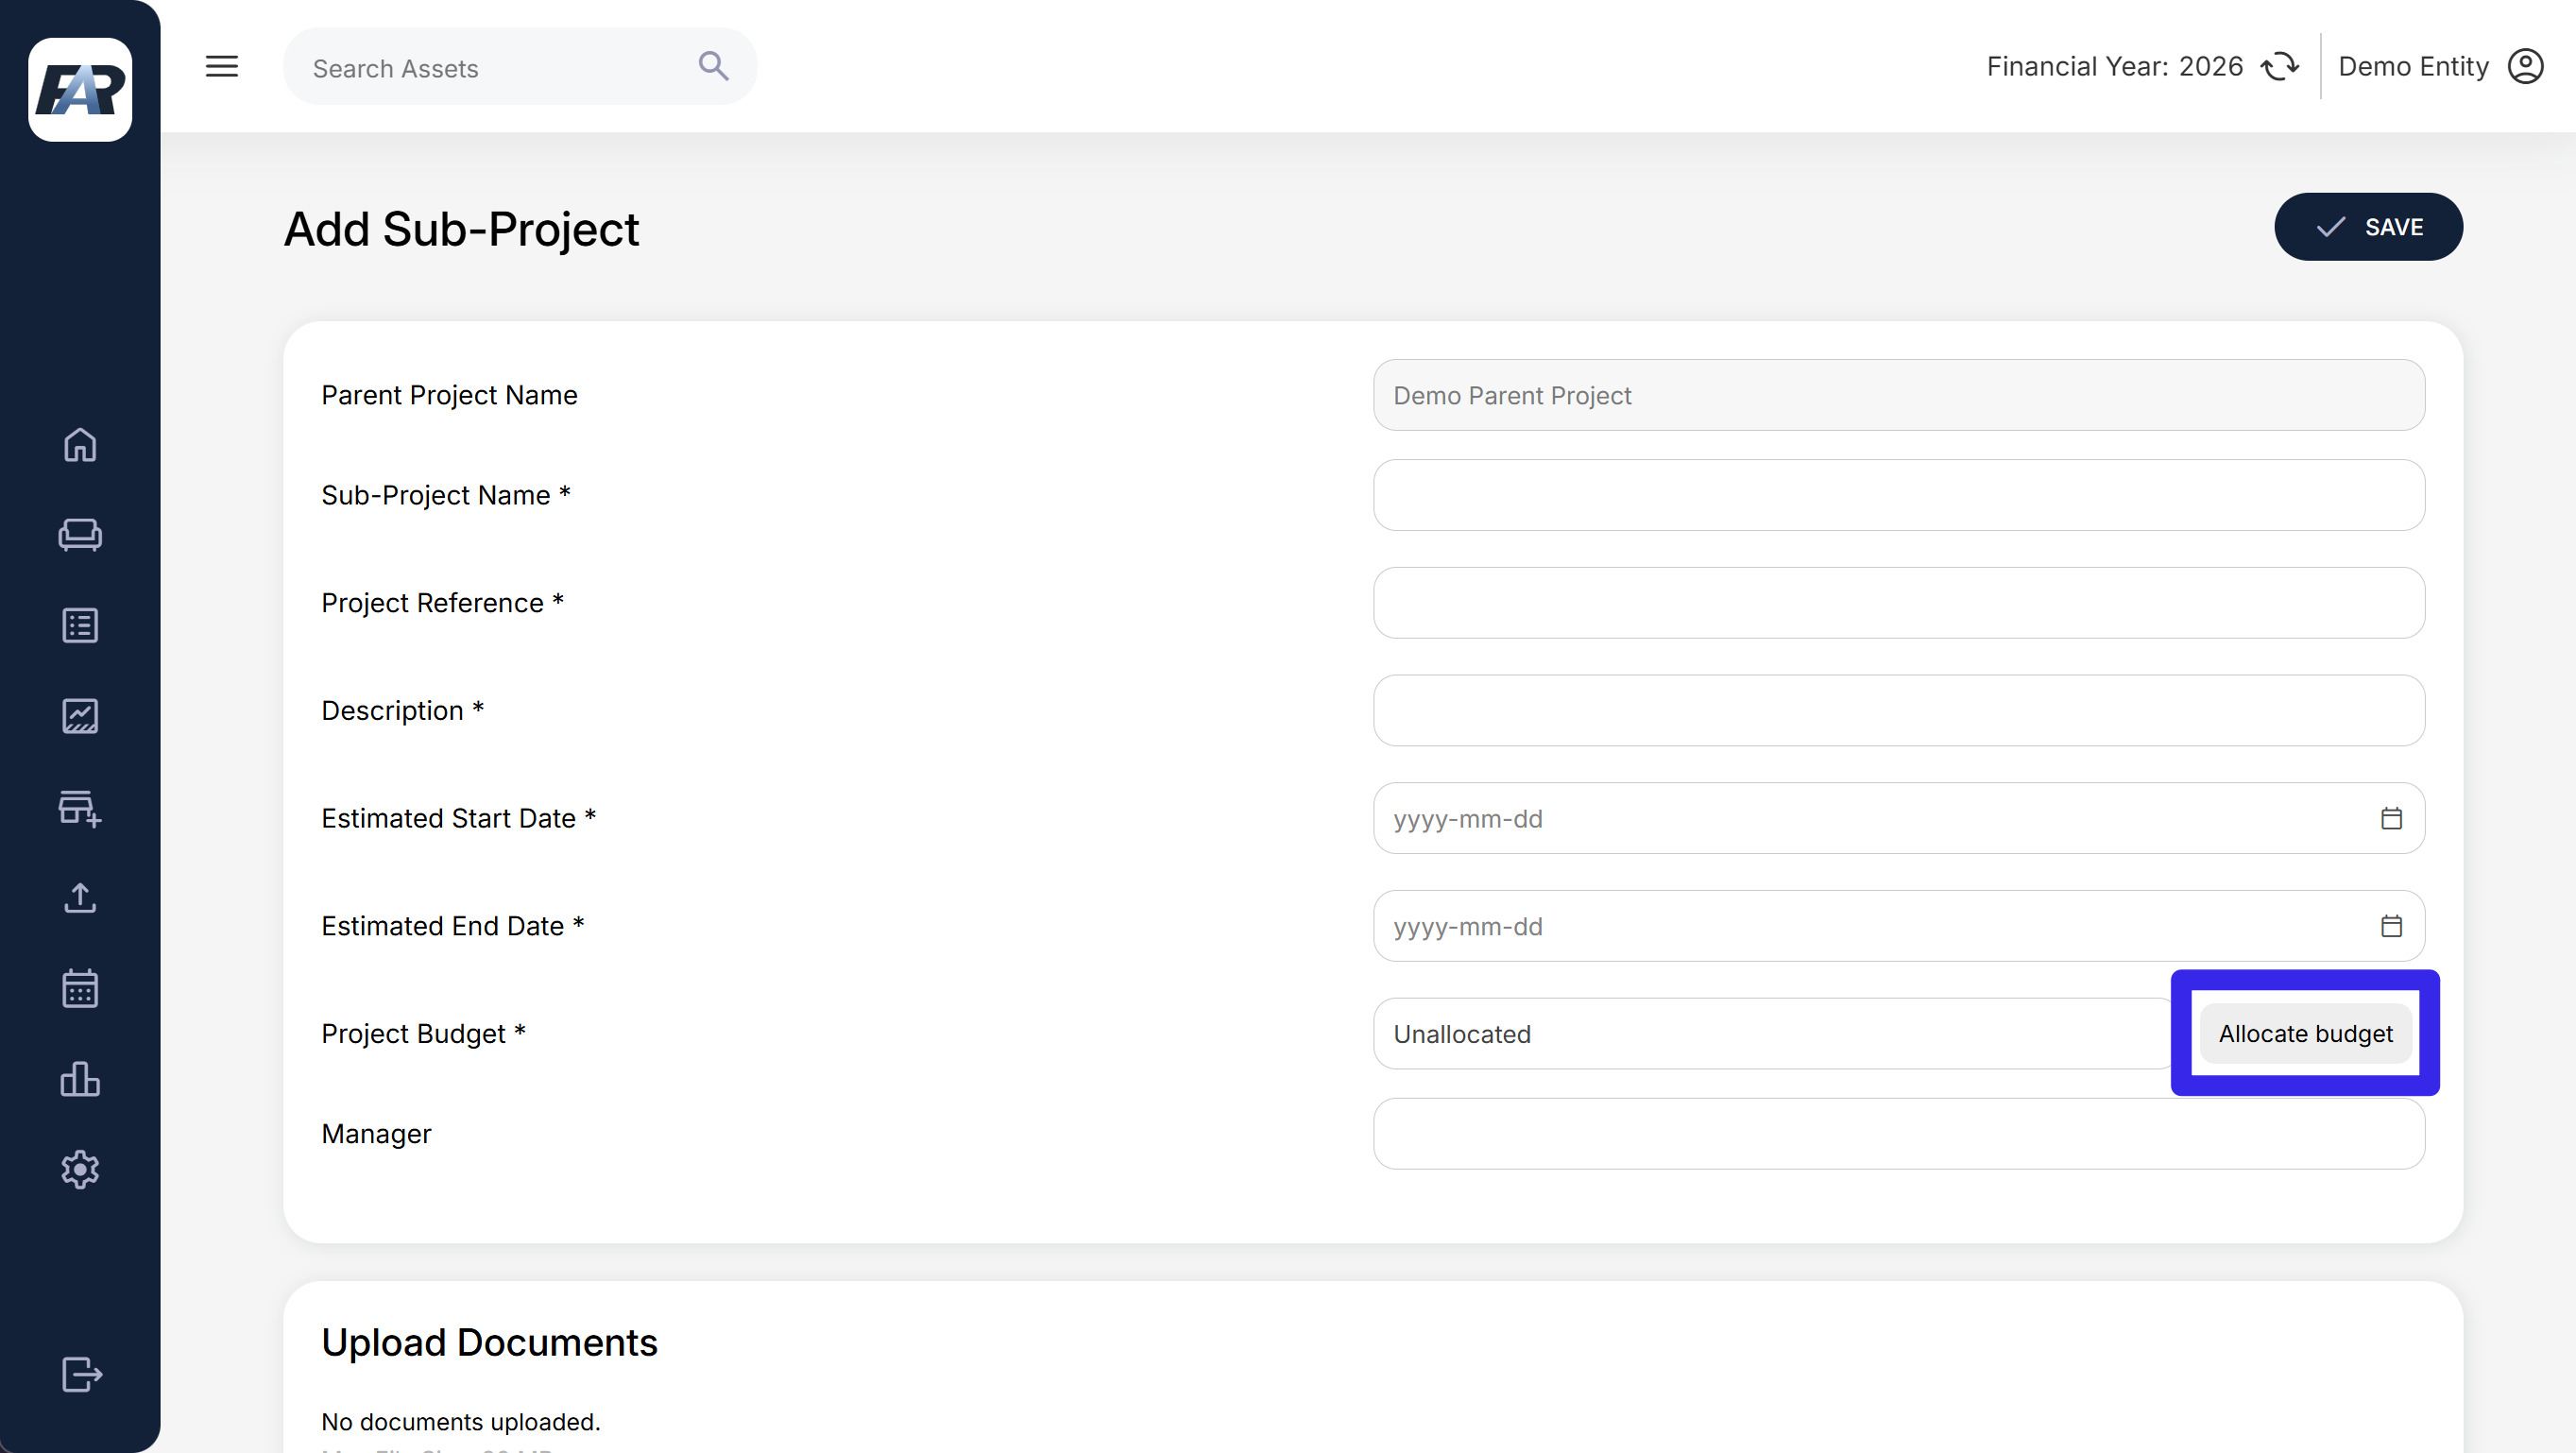
Confirm the parent project name.
-
Complete the sub-project name, reference, description, estimated dates and manager.
-
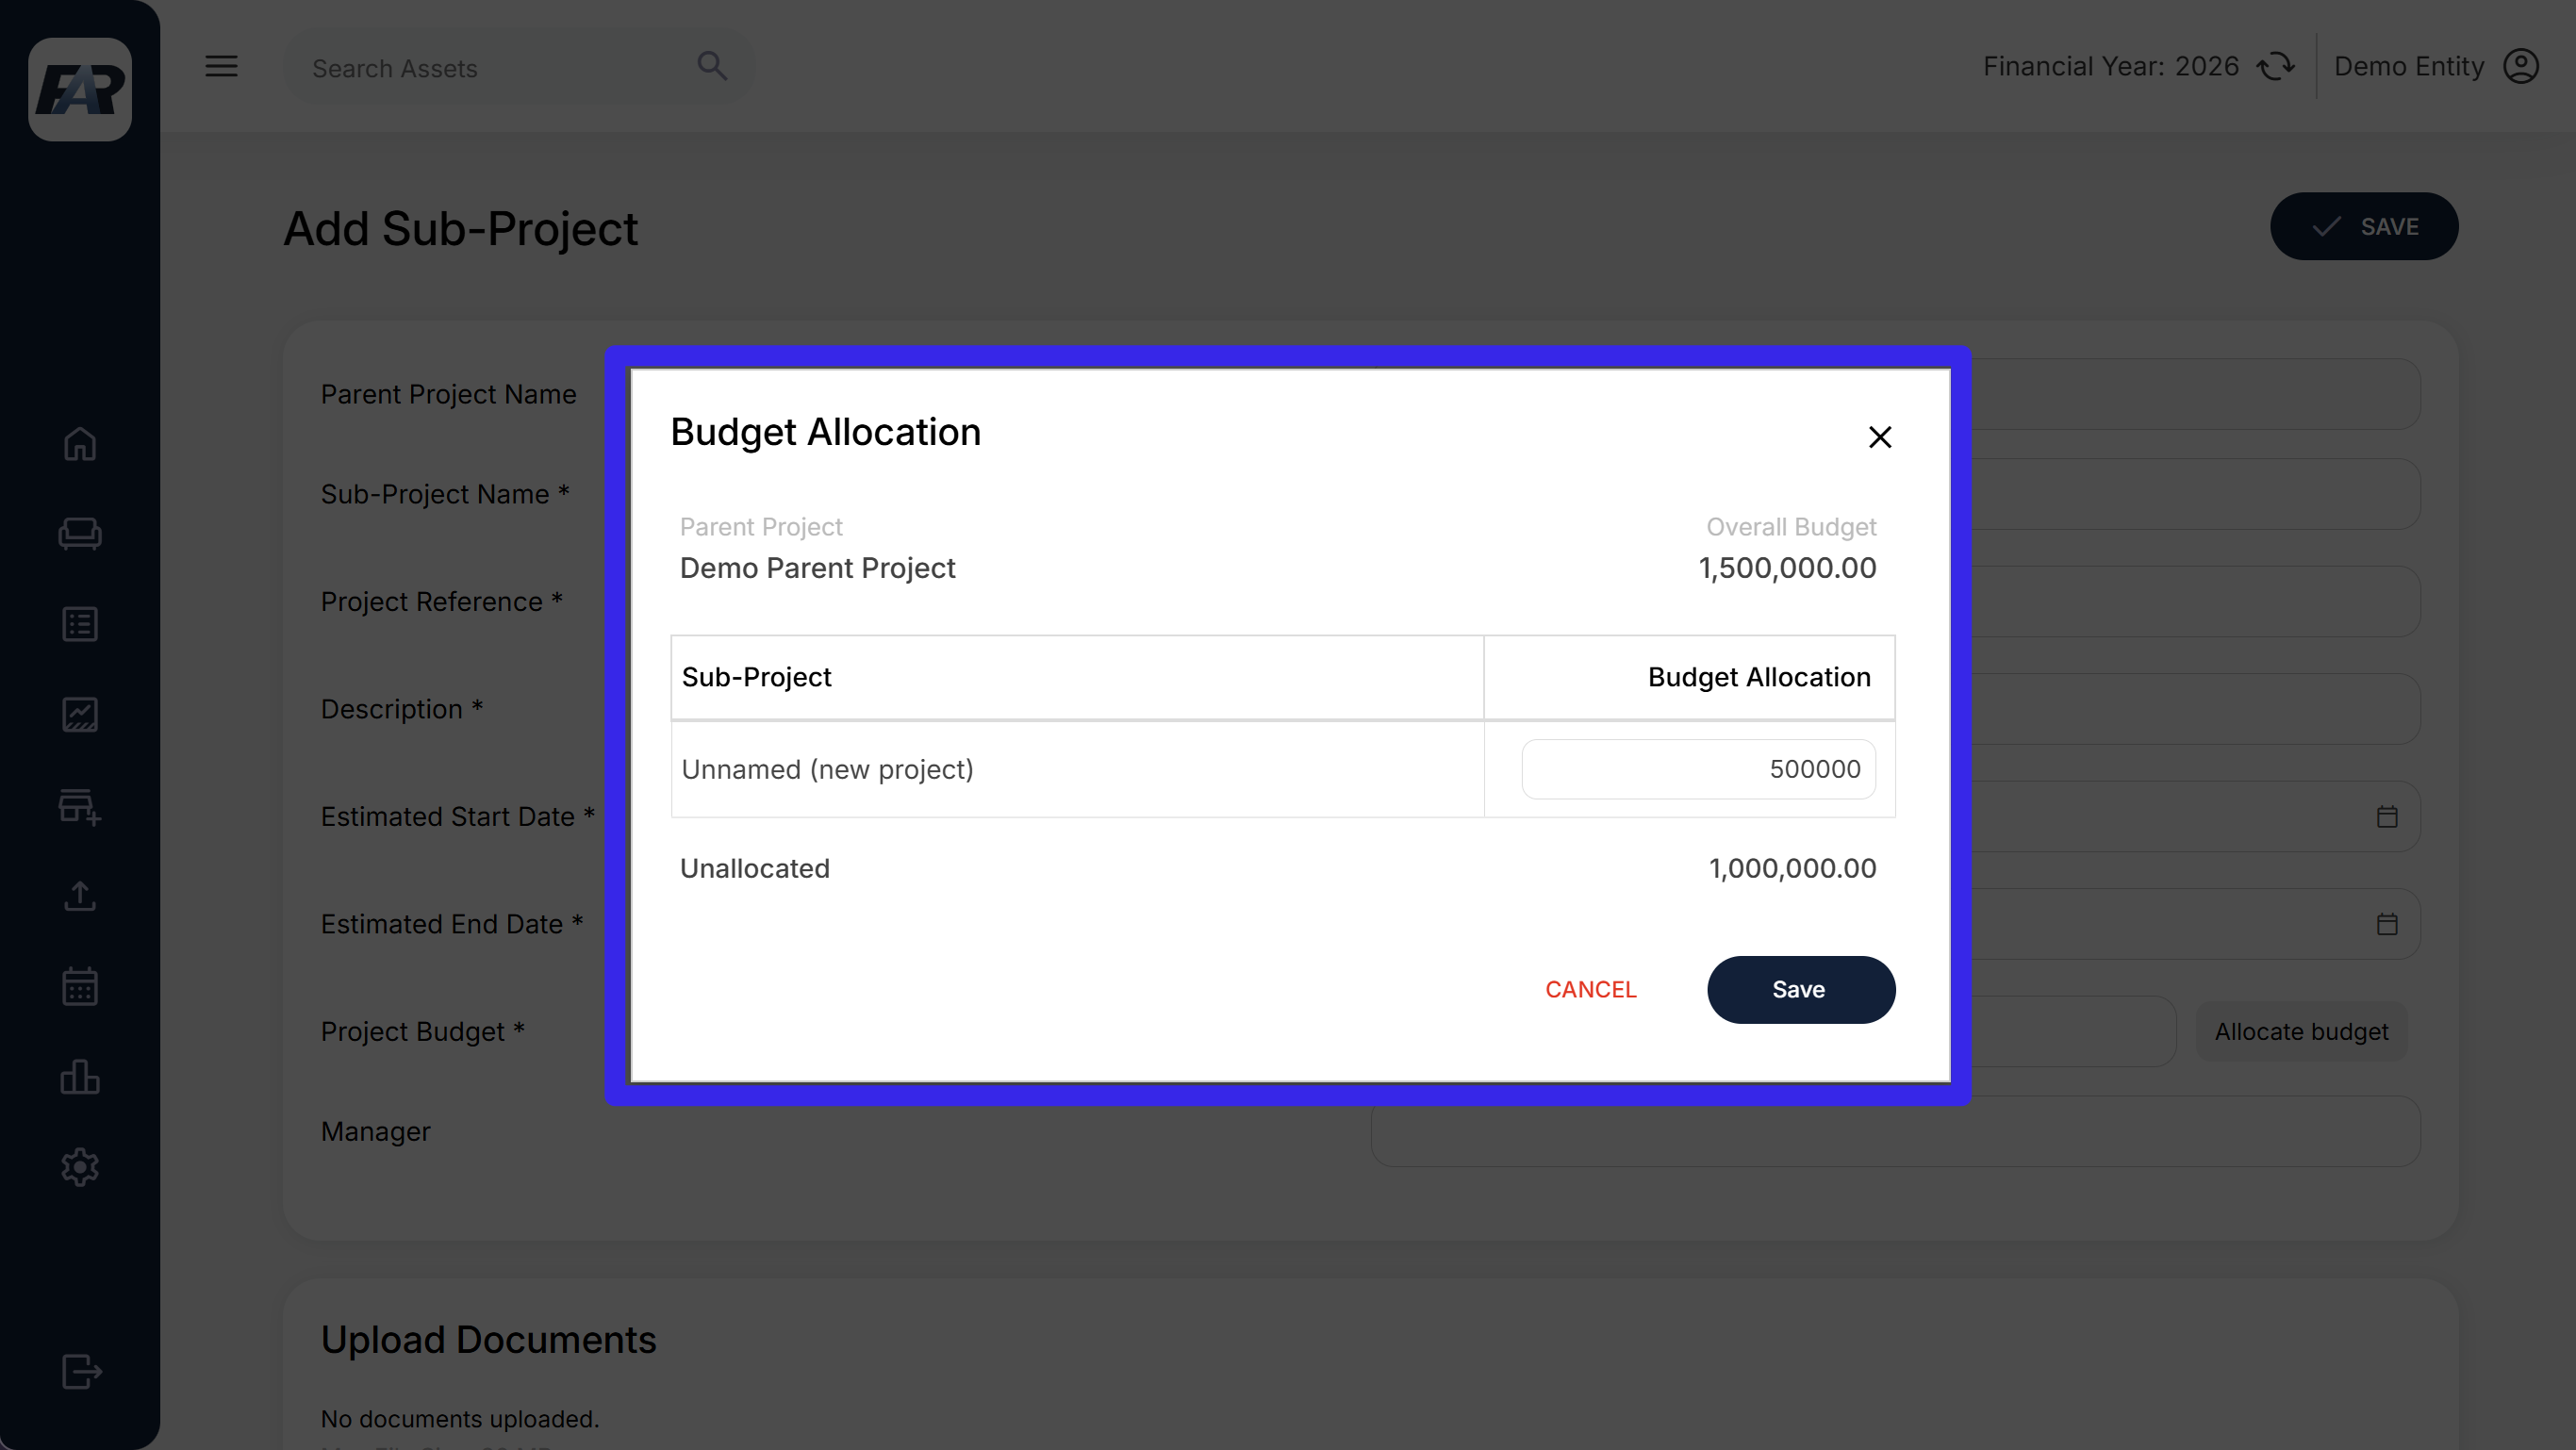
Use Allocate budget where offered to review the parent budget and allocations.
-
Enter the intended allocations and check the displayed unallocated amount.
-
Save the allocation dialogue and then Save the project form.
-
Reopen the parent project and confirm the child and budget allocation.
Review the total allocation against the approved parent budget. Do not treat the displayed unallocated amount alone as proof that a budget approval exists.
6.5 Edit or delete a project
-
Open the project and select Actions > Edit Project.
-
Update the permitted descriptive, date, manager and budget fields.
-
Save and verify the revised project and parent allocation, where applicable.
To remove an erroneous project, use Actions > Delete Project when displayed and review the confirmation. The menu offers deletion for an in-progress project with no WIP assets; do not assume this guarantees that every other dependency permits deletion. Do not use deletion to mark completed work.
6.6 Add a WIP asset (via interface)
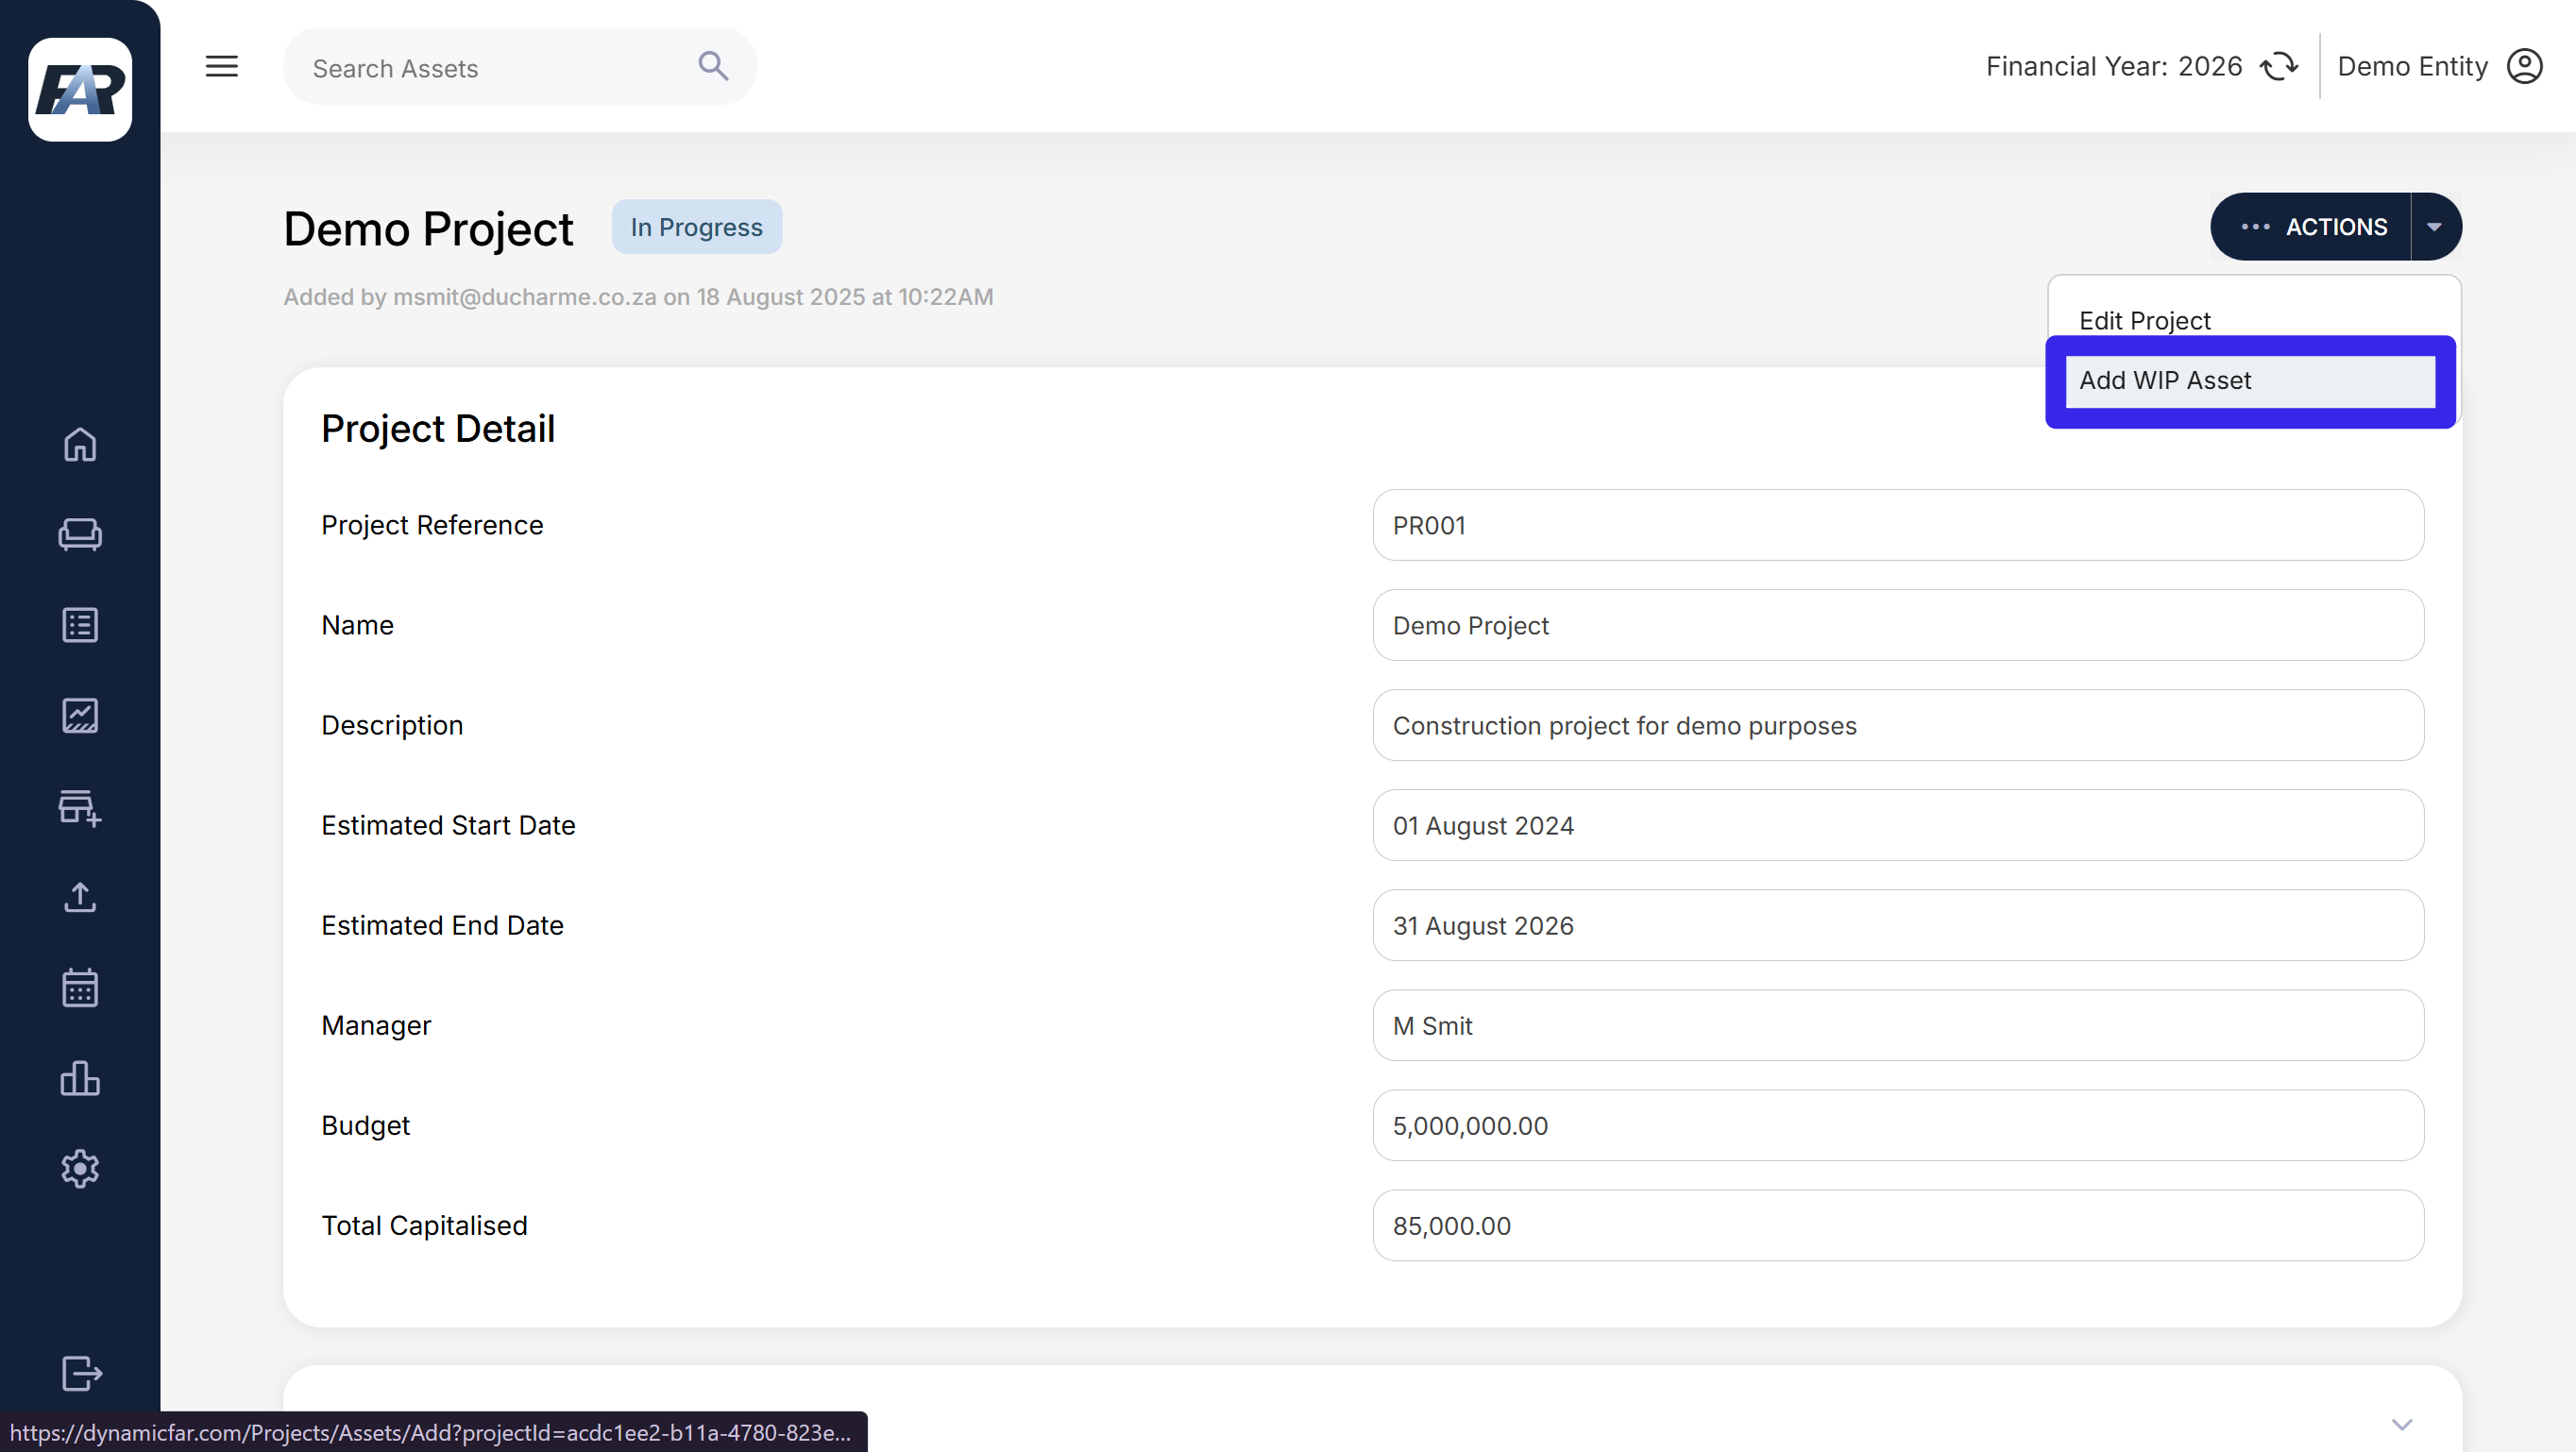
Navigation: Projects > eligible project > Actions > Add WIP Asset.
-
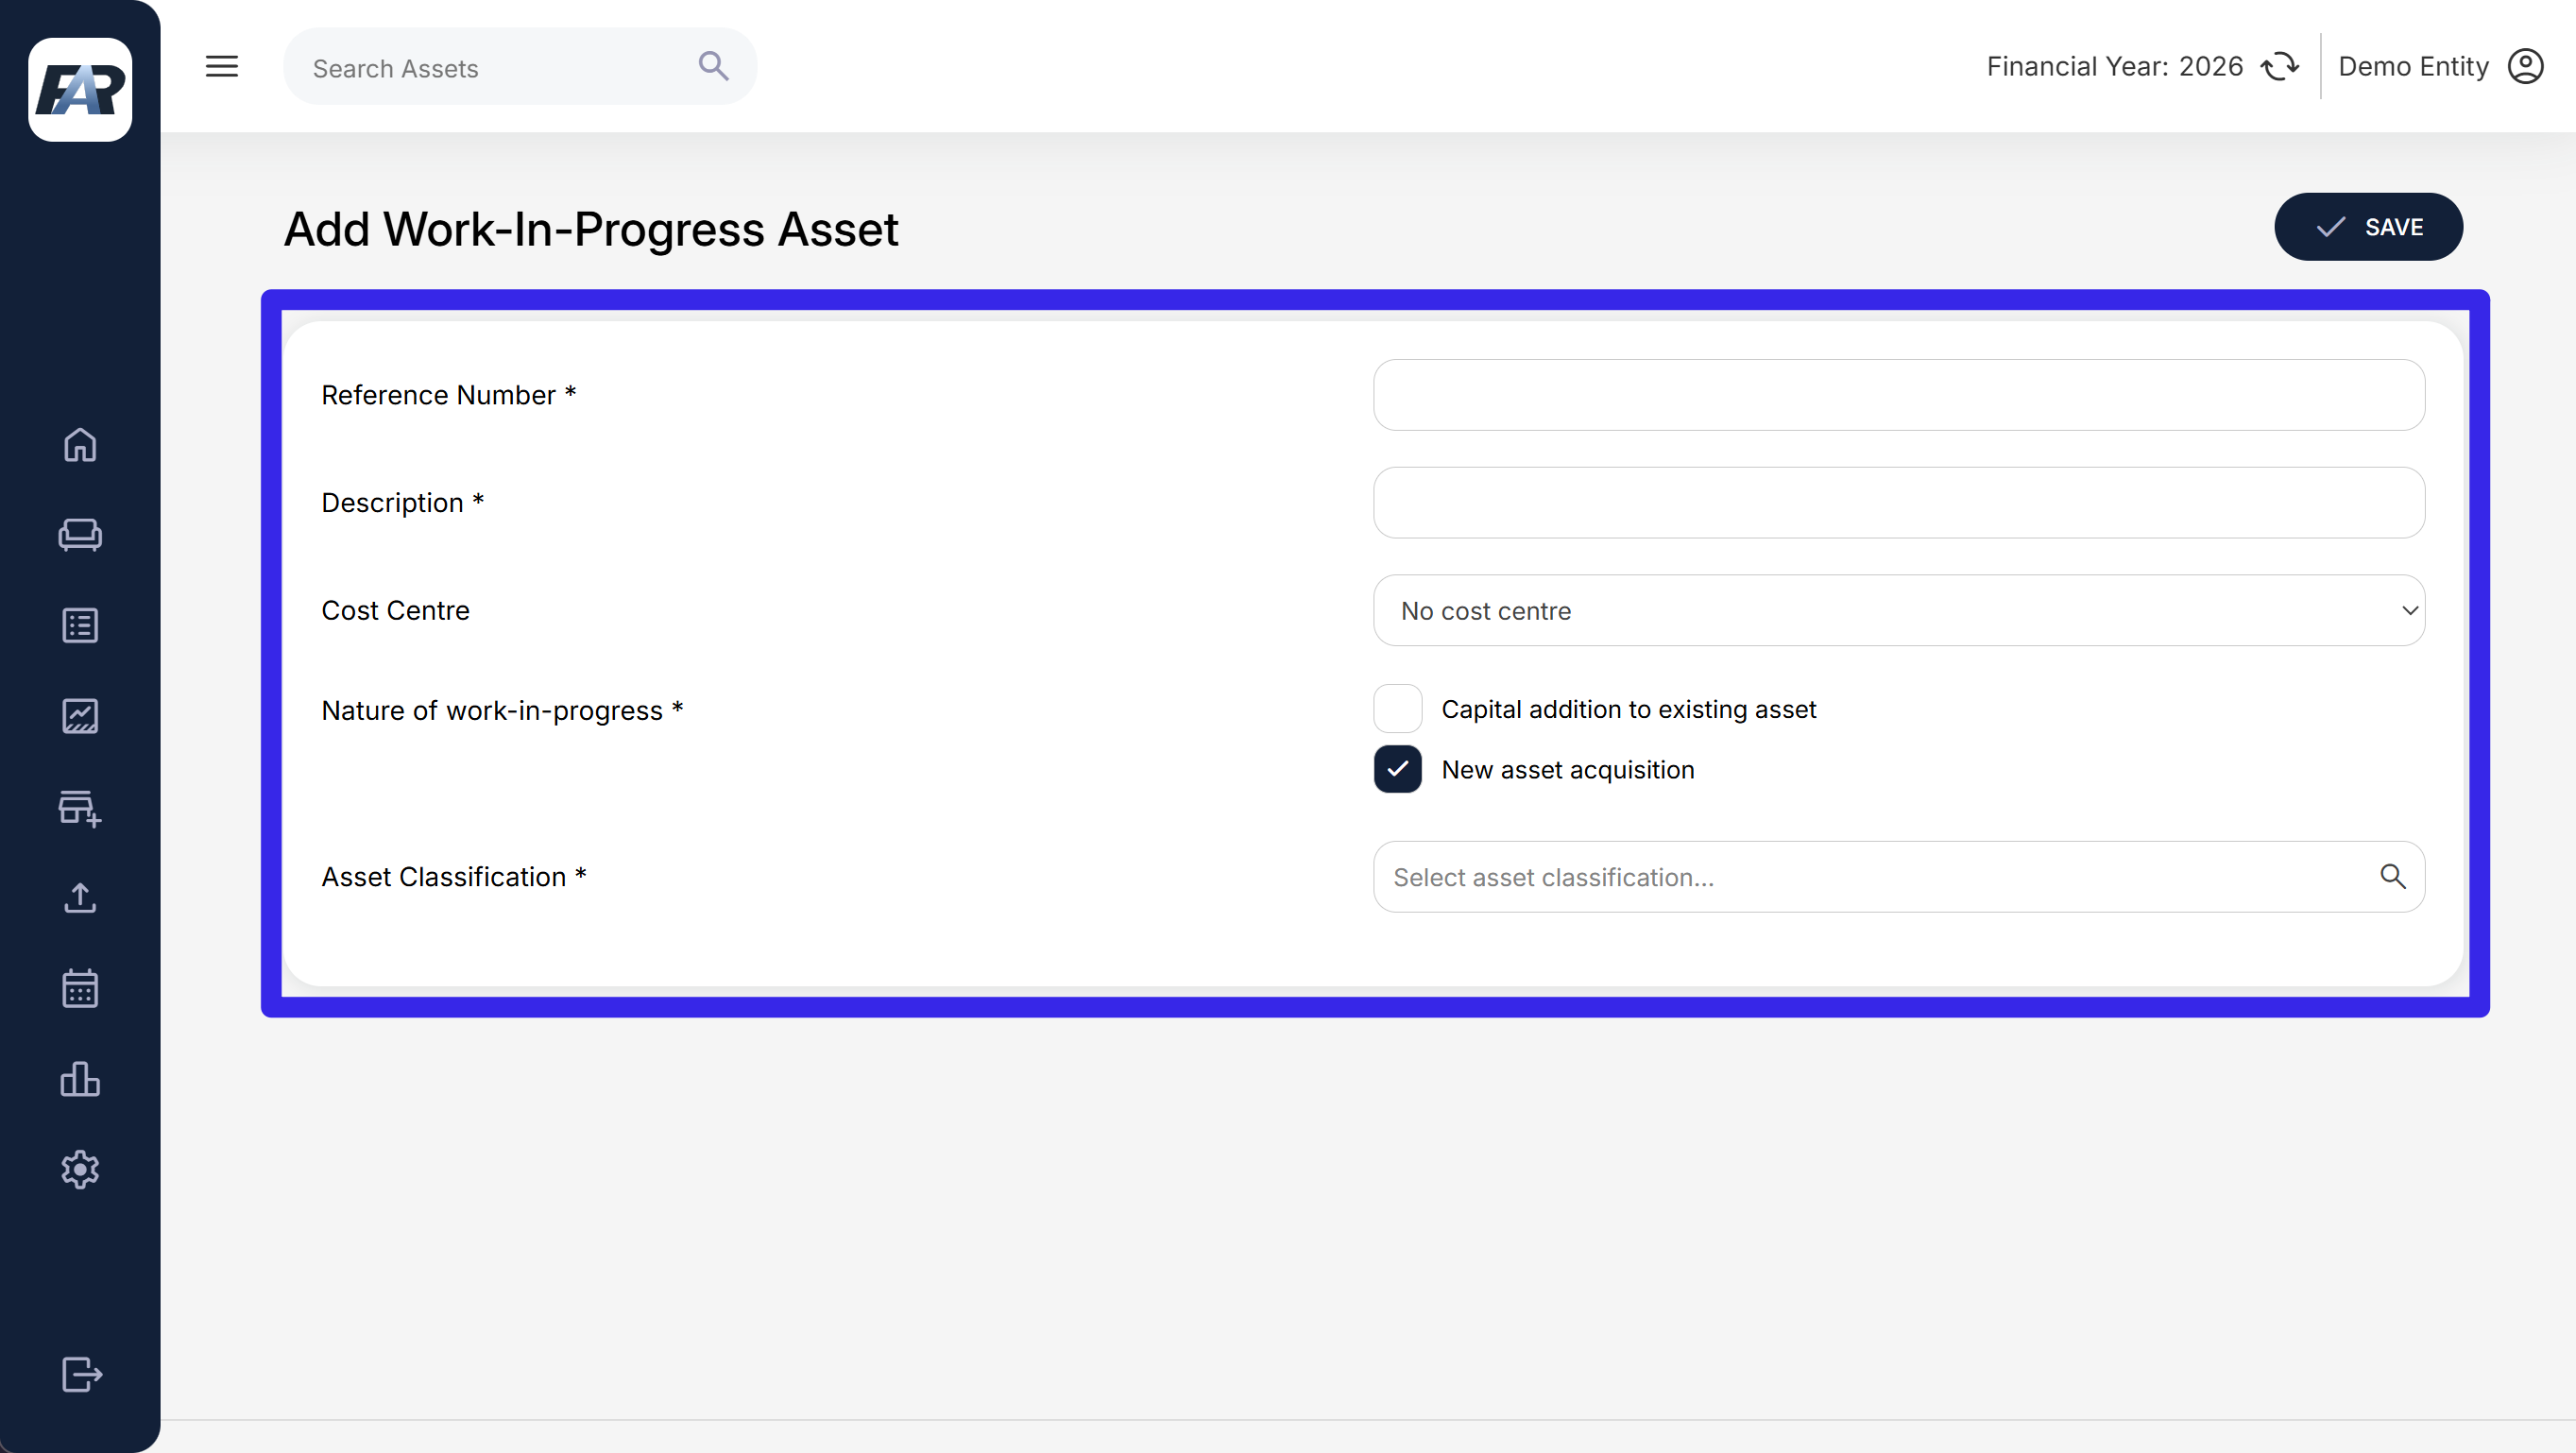
Enter Reference Number and Description.
-
Choose an active Cost Centre, or No cost centre if appropriate.
-
Select Nature of work-in-progress: New asset acquisition or Capital addition to existing asset.
-
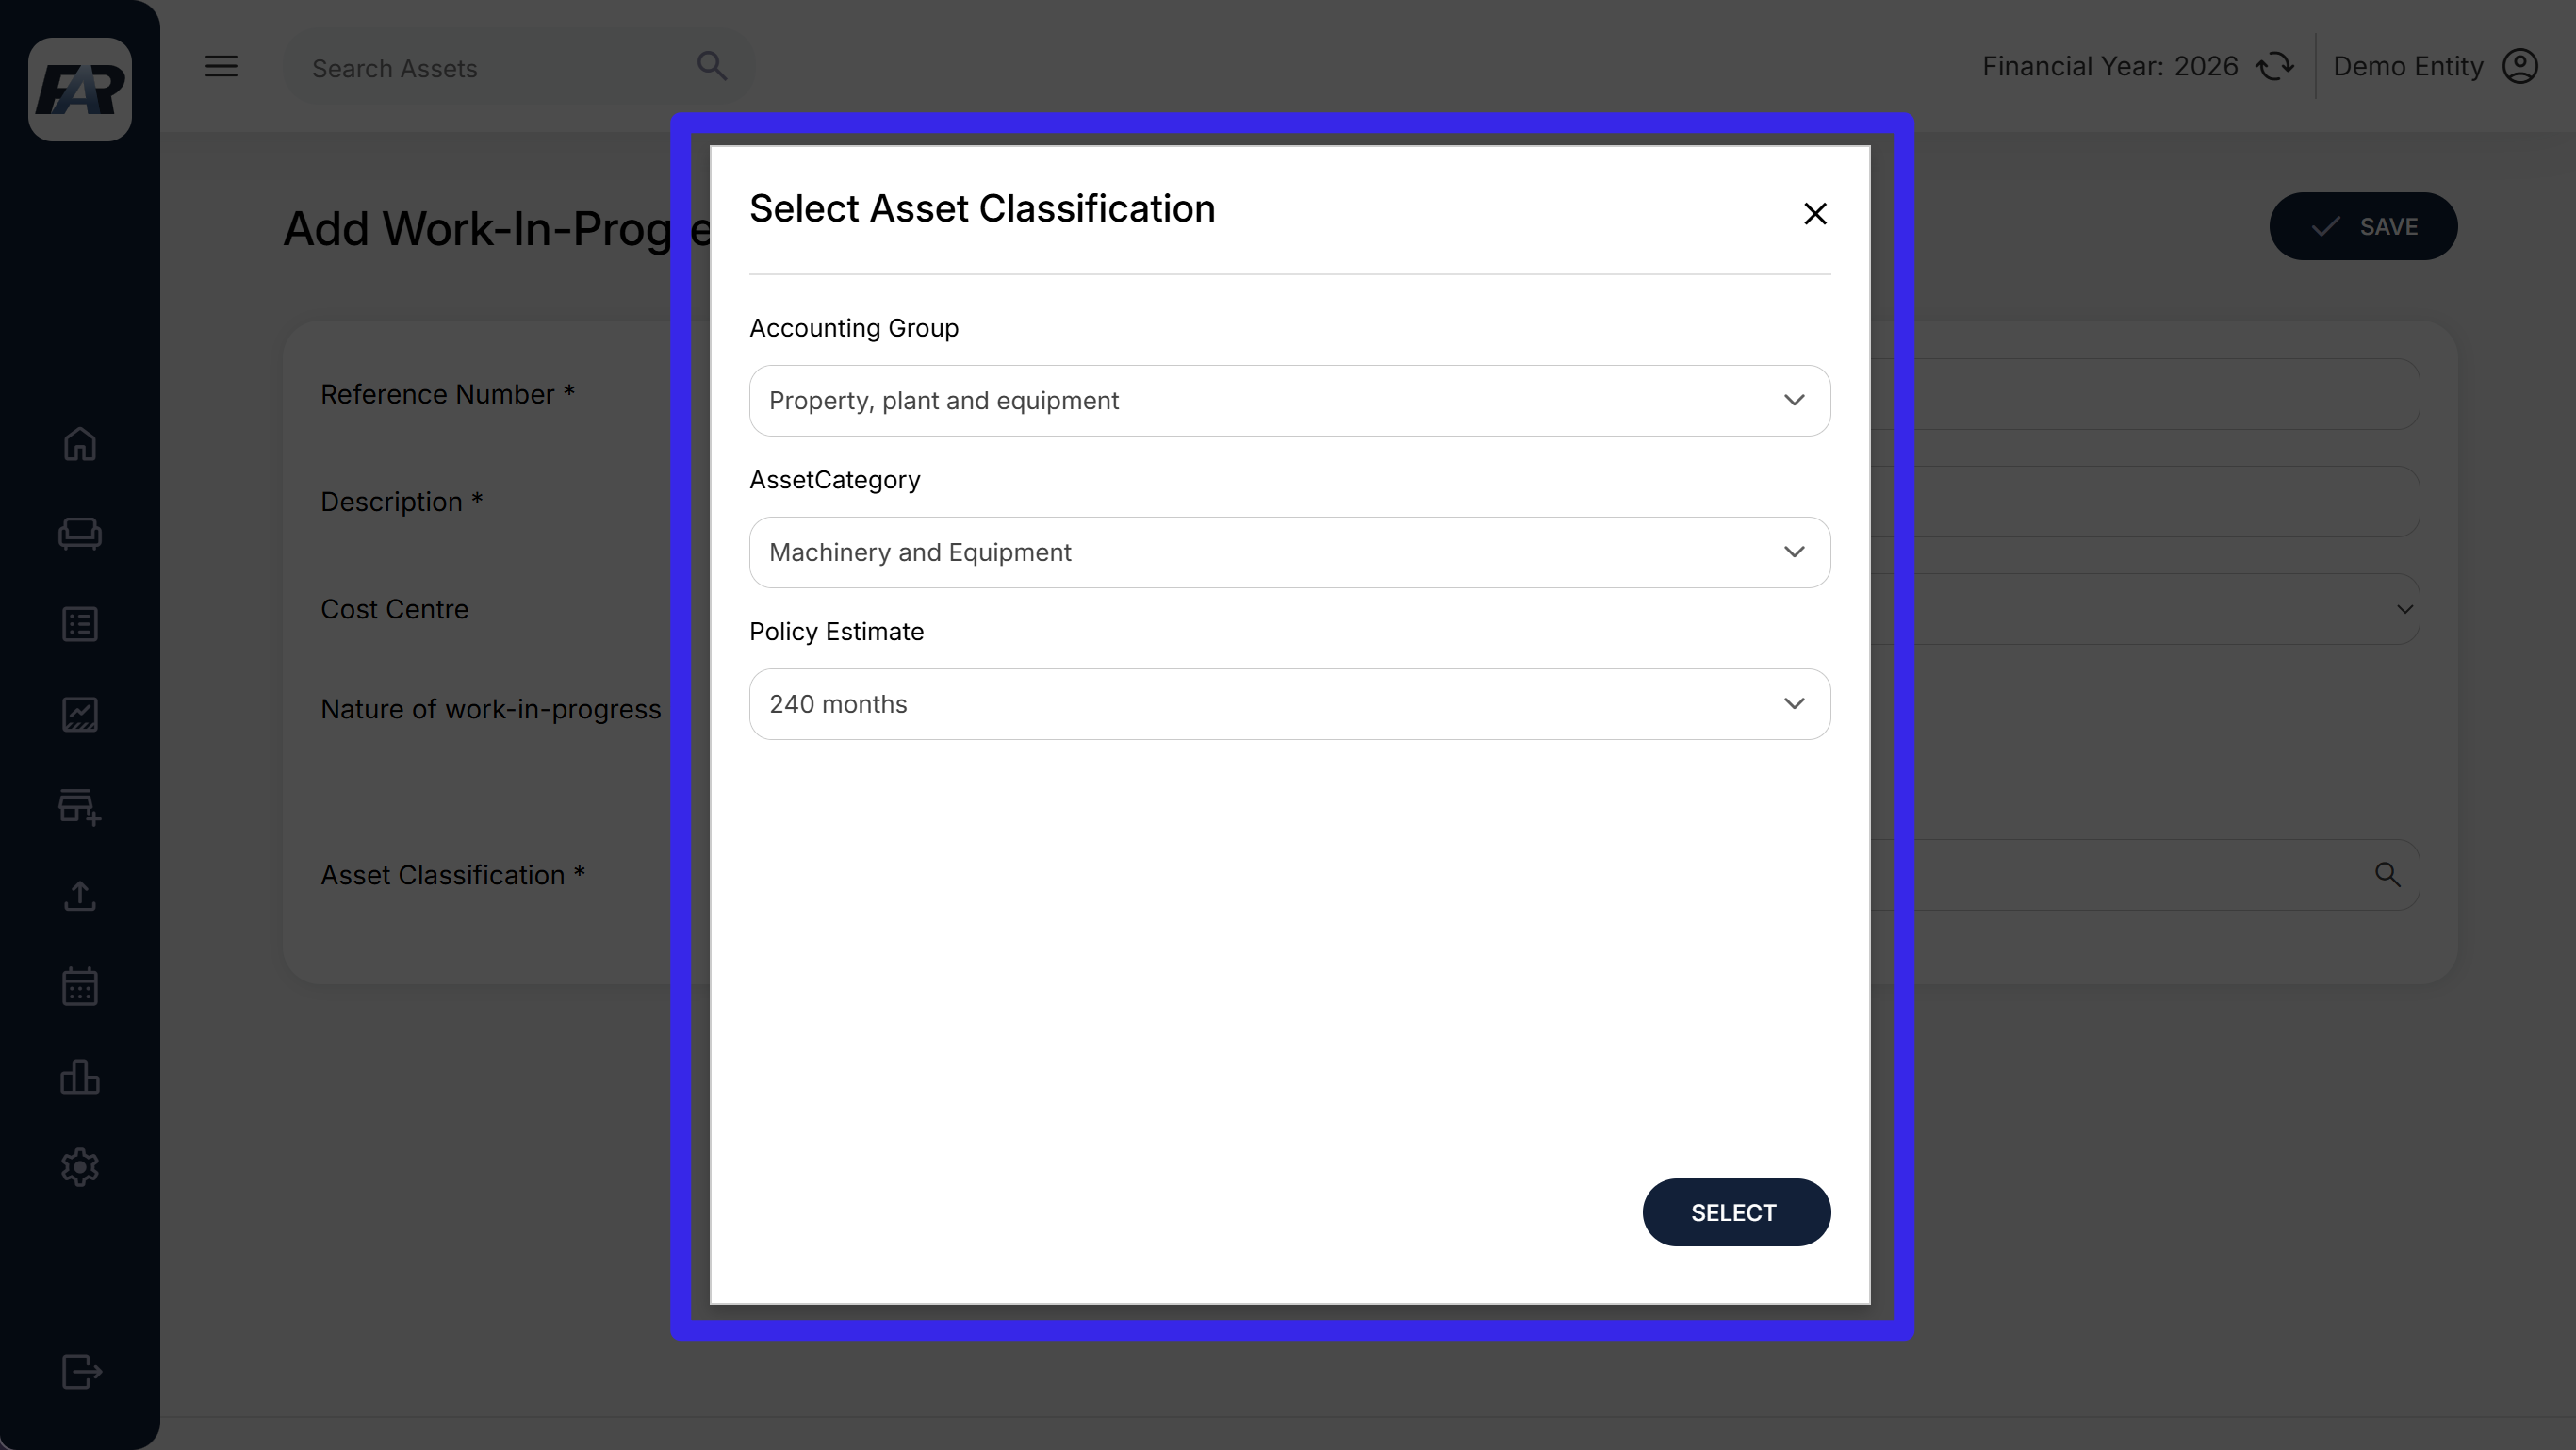
For a new asset, select the intended asset classification.
-
For an addition, select the existing asset requested by the form.
-
Select Save and verify the WIP detail.
The WIP reference must not duplicate an existing reference. The existing-asset-addition selection is present, but its interactive Mark as Complete route is incomplete in the reviewed version. Arrange the supported completion process with the administrator before relying on that workflow.
6.7 Import WIP assets (via importer)
-
Open Import > Import.
-
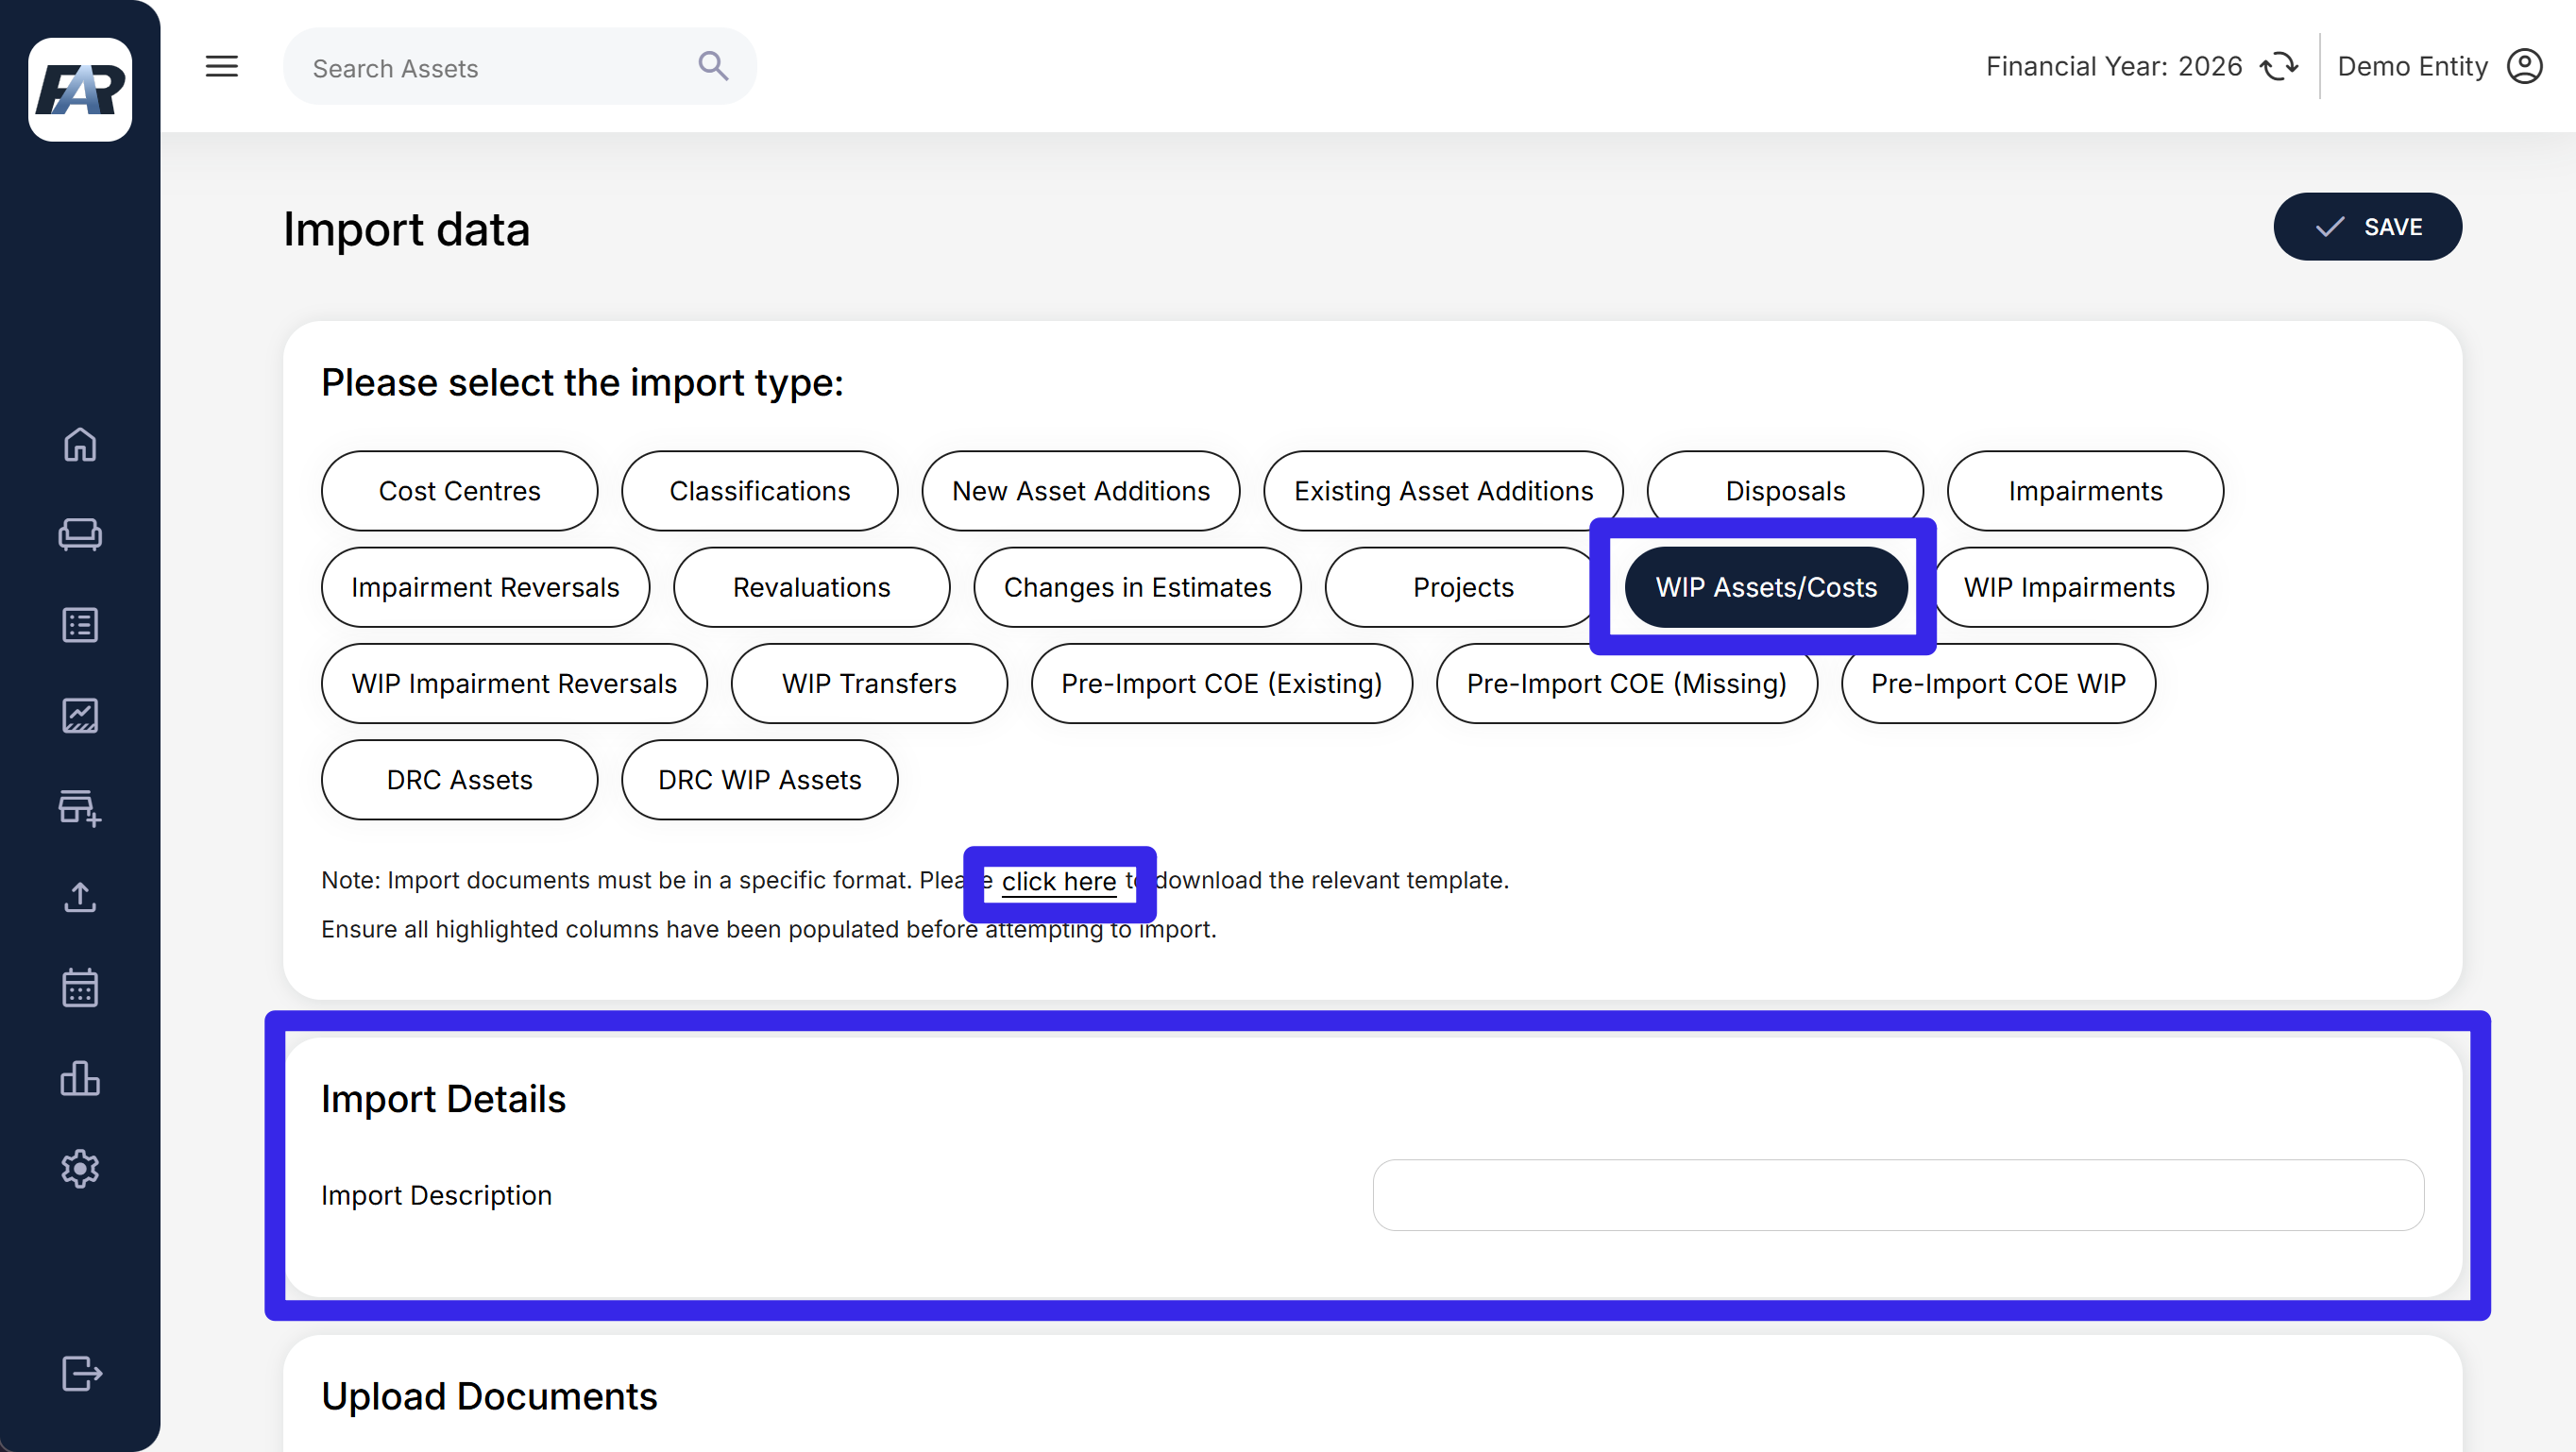
Choose “WIP Assets/Costs” as the import type.
-
To download the relevant template, use the “click here” button.
-
Provide an import description that is relevant to the data being imported, e.g. “New WIP assets for 2026”.
-
Once the template has been downloaded, select the “AssetInProgress” tab and enter with data to be imported. Ensure at least the required (highlighted) columns have been populated:
-
Project Name (required). This is a pre-populated drop-down menu of existing projects on the system. Only existing projects can be chosen as a project to which a WIP asset is being added.
-
Asset Description (required)
-
IsCapitalAddition (required). Select “TRUE” if this WIP asset will eventually be capitalised to an existing asset within the DynamicFAR system. Select “FALSE” if this WIP asset will eventually be capitalised as a brand new asset within the system with a new barcode/reference nr.
-
Asset Barcode / Reference Number (required). This refers to the WIP asset’s reference number.
-
Asset Classification (required)
-
Cost Center (not required)
-
-
Upload the populated template in the document section of the importer.
-
Click Save.
6.8 Edit or delete a WIP asset
-
Open Projects > project > WIP asset.
-
While the asset is In Progress, select Actions > Edit Asset.
-
Update the reference, description, cost centre or classification fields available.
-
Save and inspect the result.
For an erroneous WIP record, select Actions > Delete Asset, review the warning and confirm only after checking its costs and events. A completed WIP record no longer presents the same action menu. Refer completed-record corrections to your administrator.
6.9 Add a WIP asset cost (via interface)
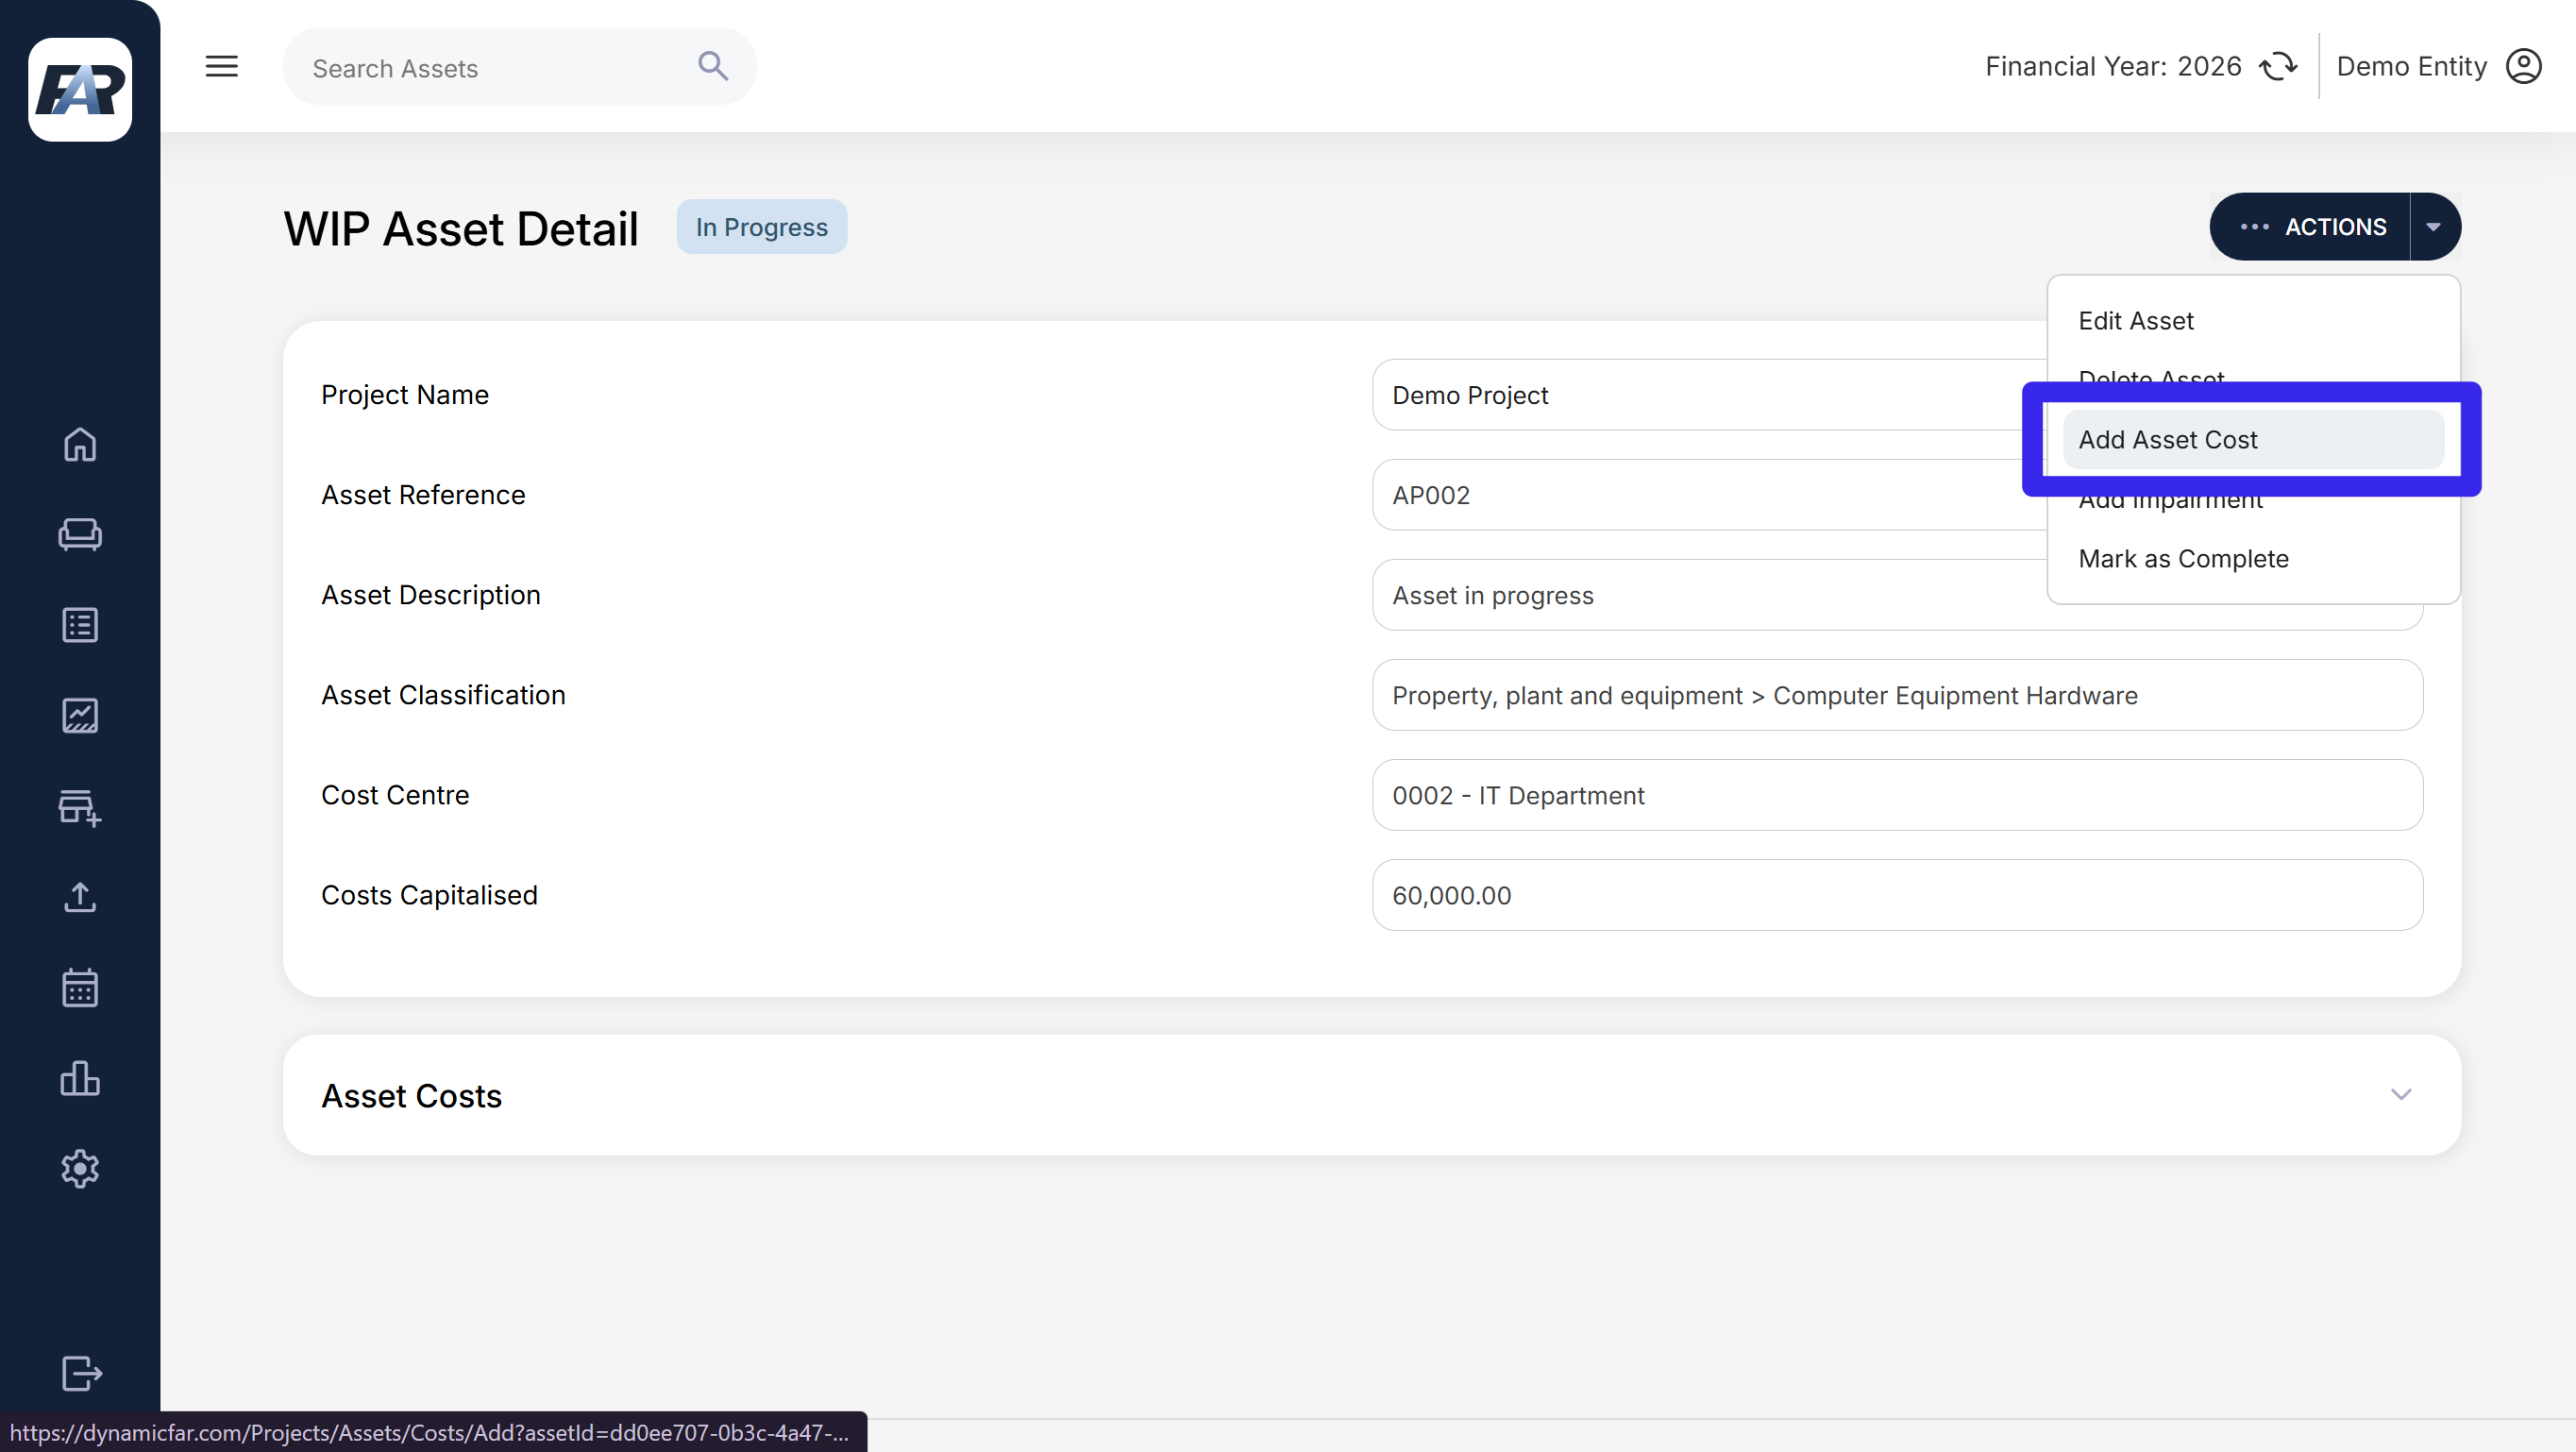
Navigation: Projects > project > WIP asset > Actions > Add Asset Cost.
-
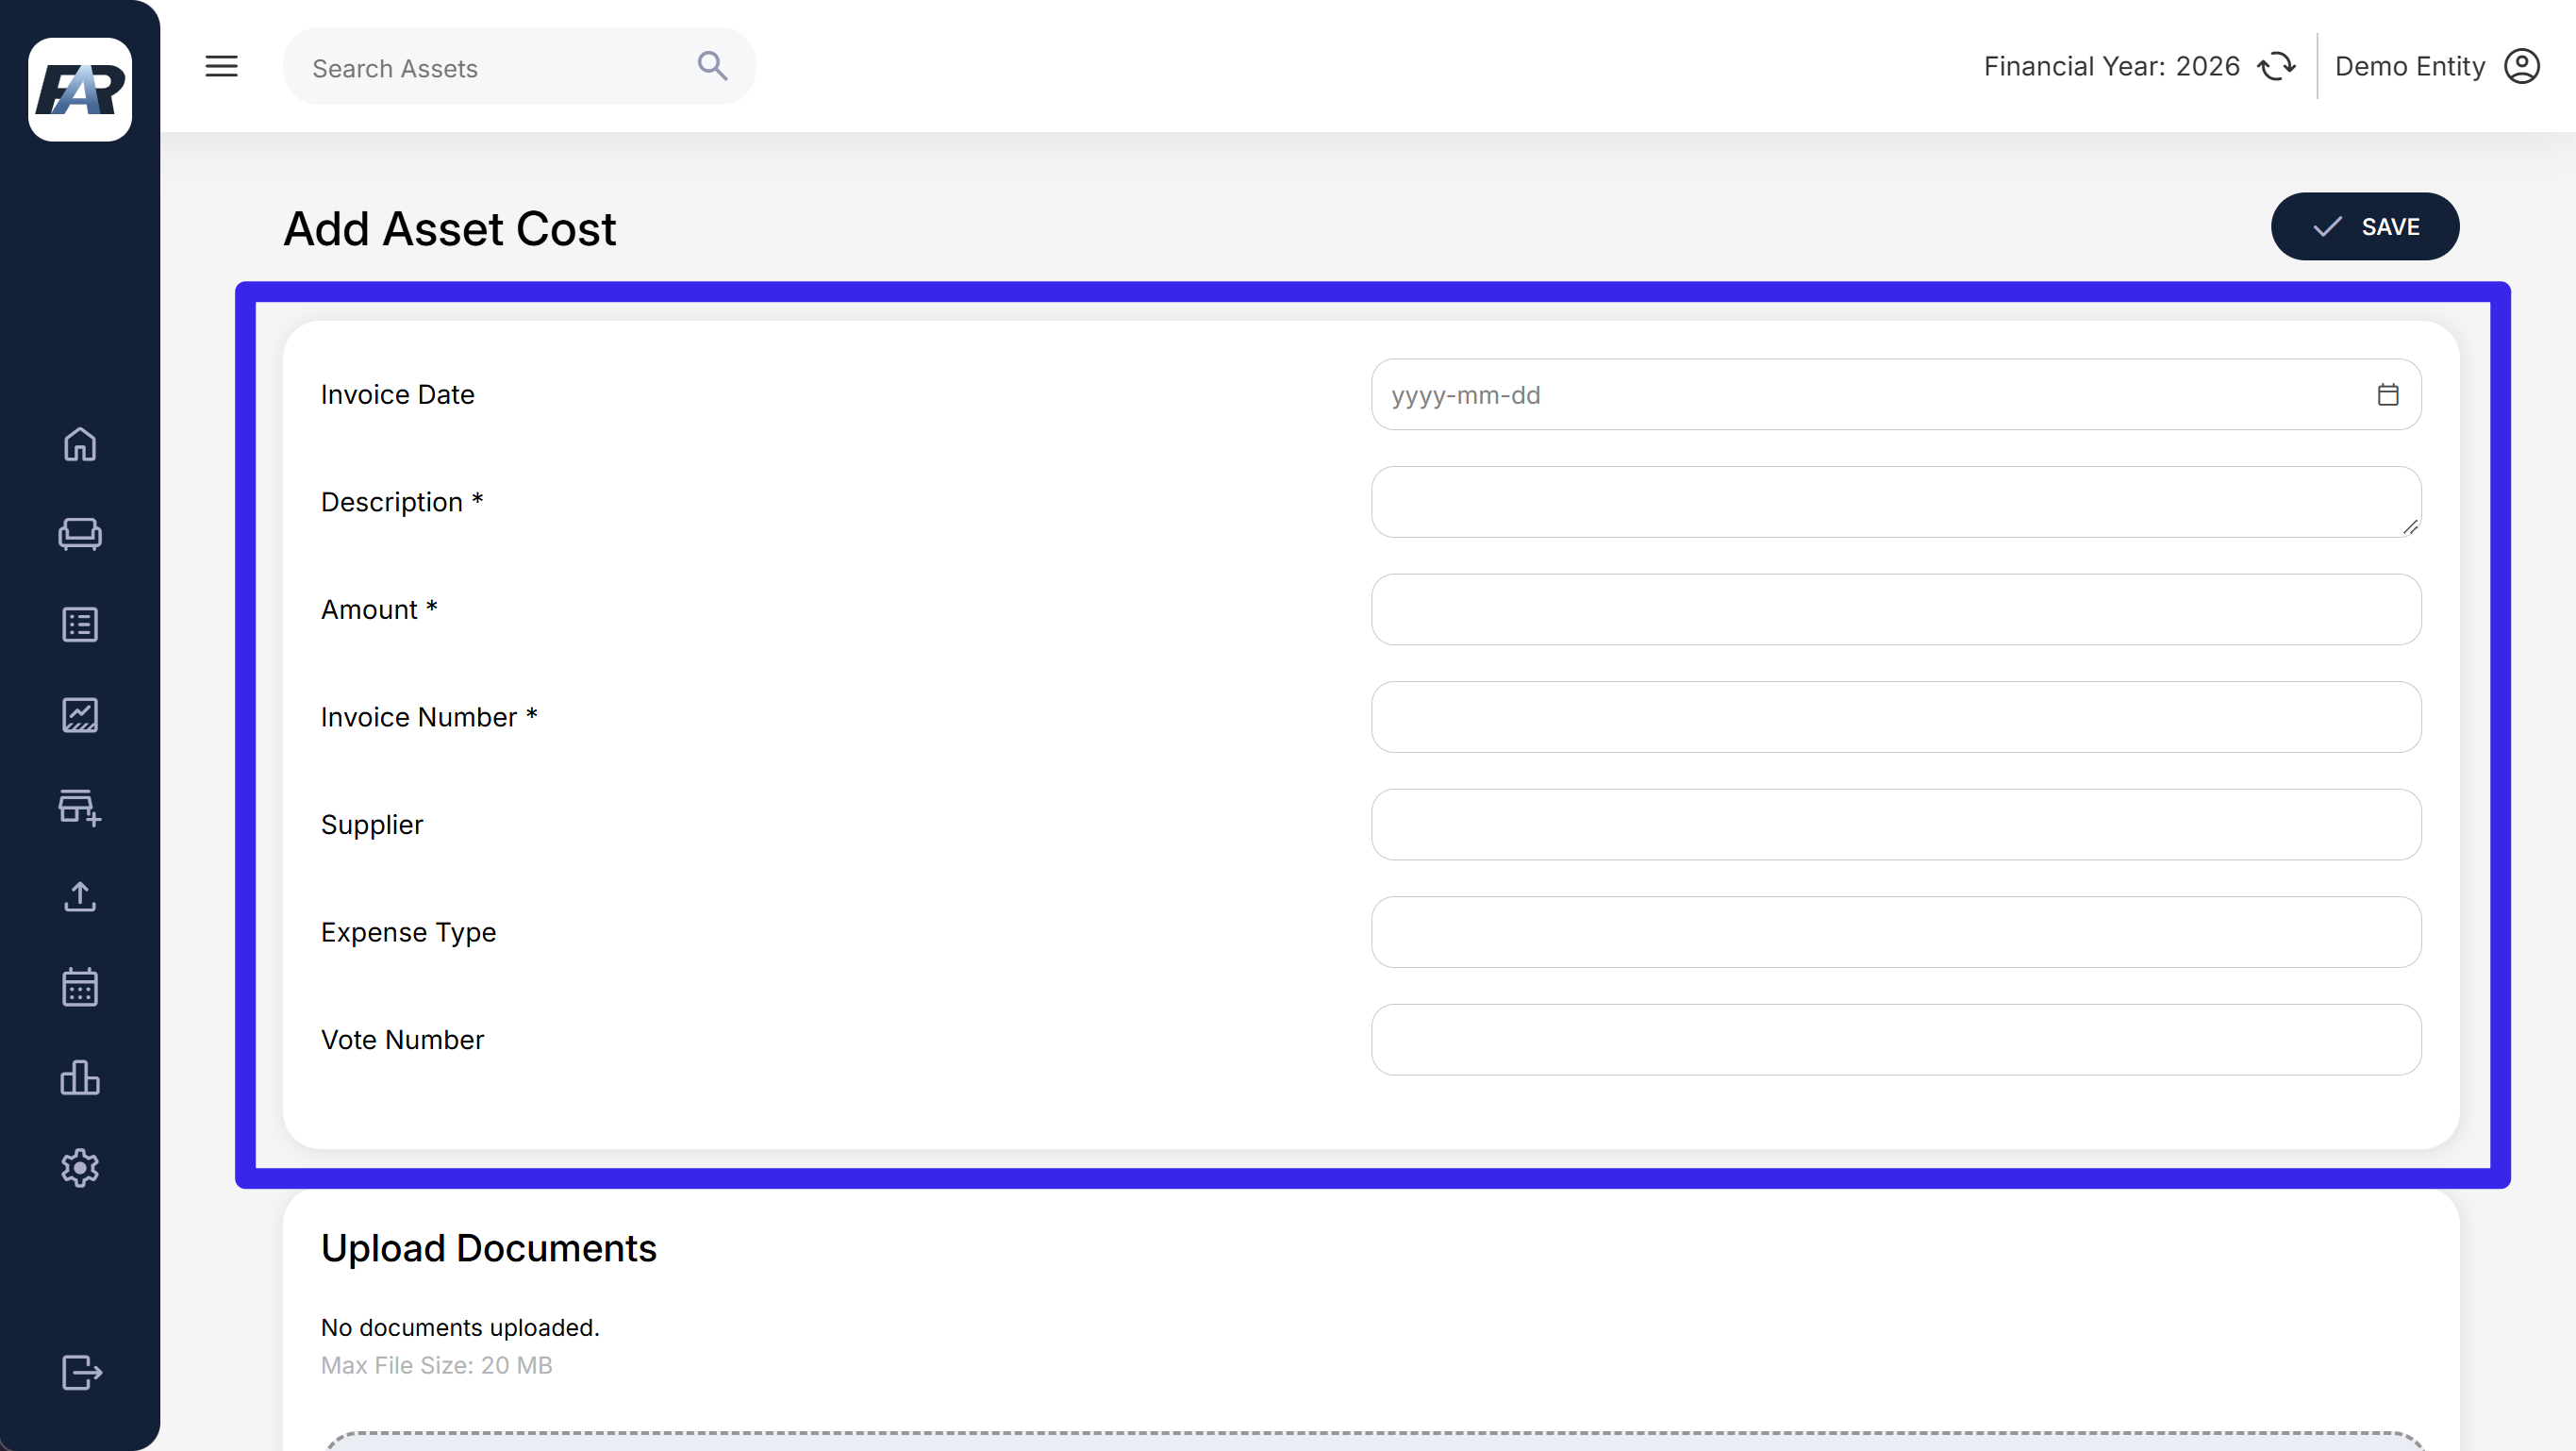
Enter Invoice Date.
-
Enter Description, Amount and Invoice Number.
-
Complete Supplier, Expense Type and Vote Number where relevant.
-
Attach the invoice and capitalisation evidence.
-
Select Save.
-
Open the cost from Asset Costs and check its values and supporting documents.
-
Confirm the WIP asset's costs and project totals reflect the entry.
Only enter amounts approved for capitalisation. Keep the source invoice and the basis for any allocation between assets. A cost-centre assignment and a vote number serve different purposes; complete each relevant field.
6.10 Import WIP Asset Costs (via importer)
Navigation: Import > Import.
-
Choose “WIP Assets/Costs” as the import type.
-
To download the relevant template, use the “click here” button.
-
Provide an import description that is relevant to the data being imported, e.g. “New WIP assets for 2026”.
-
Once the template has been downloaded, select the “AssetCosts” tab and enter with data to be imported. Ensure at least the required (highlighted) columns have been populated:
-
Asset in Progress Reference Number (required)
-
Invoice Date (required)
-
Cost Description (required)
-
Expense Type (not required)
-
Amount (required)
-
Supplier (not required)
-
Invoice Number (required)
-
Vote Number (not required)
-
-
Upload the populated template in the document section of the importer.
-
Click Save.
6.11 Edit or delete a WIP cost
Navigation: WIP asset > Asset Costs > cost > Actions.
-
Select Edit Asset Cost.
-
Update the editable invoice date, amount, description, invoice number, supplier, expense type or vote number.
-
Save and review the cost and totals.
To remove an erroneous cost, select Delete WIP Cost and review the warning. Some cost fields may be read-only depending on the record's state. Do not assume deleting a cost reverses a completed transfer or resolves prior-year accounting effects.
6.12 Impair a WIP asset
-
Open the in-progress WIP asset.
-
Select Actions > Add Impairment.
-
Enter the effective date, assessment description and recoverable amount requested.
-
Review the calculated reduction, attach evidence and save.
-
Check the project's WIP carrying value and WIP report.
Use WIP Impairments and WIP Impairment Reversals for bulk entries. Do not select the ordinary asset import type for a WIP event. Review construction delays or discontinued work under the applicable accounting assessment before entering an amount.
6.13 Complete a WIP asset and create the finished asset
Navigation: WIP asset > Actions > Mark as Complete.
Before you start: The WIP asset must have costs and be ready for completion. This procedure describes New asset acquisition WIP.
-
Reconcile the WIP costs, impairments and evidence.
-
Select Mark as Complete.
-
Enter Asset Completion Date. The date control uses the latest recorded WIP cost date as its minimum.
-
Review the completion notice: the date is used as depreciation commencement for a depreciable asset.
-
Select Complete to continue to the asset-entry screen.
-
Complete the finished asset's barcode, name, description and other required details.
-
Review the transferred project, classification, amount and dates carried into the form.
-
Save the finished asset. Opening the second screen alone does not complete the full process.
-
Reopen the WIP asset, project and finished asset to confirm the resulting transfer and values.
The completion dialogue displays a document-upload control, but persistence of those particular attachments is not established by the completion handler. Retain completion evidence and attach it on the final asset form, then verify it is downloadable.
For WIP capital additions to existing assets, obtain administrator assistance: the reviewed interactive completion handler does not finish that branch. The separate WIP transfer import must be evaluated for the intended case rather than assumed to be an equivalent workaround.
6.14 Review transfers from WIP
Where a transfer-detail link is available, open it and review the transfer date, type, total amount and costs transferred. Reconcile the amount out of WIP to the receiving asset or event.
The reviewed Edit Asset Transfer link and WIP transfer edit screen do not provide a complete working edit path. Do not assume selecting Save changes a transfer. Ask support to investigate and use an approved correction route. Import reversals are separate operations with their own consequences; see article 7.6.
Reverse a transfer: On an eligible transfer-detail page, select Actions > Reverse Transfer, review the warning and confirm only when the transfer should be removed. The warning states that reversal removes the finished asset from the register and resets the WIP asset to in progress, and cannot itself be reversed. Check the receiving asset's subsequent events before proceeding. After the operation, verify the WIP status, removal of the transferred asset and the resulting balances. The handler assumes a transfer linked to a finished asset; obtain support for other transfer types.
6.15 Mark a project complete
-
Open the project and check all WIP assets and child projects.
-
Complete the outstanding WIP assets and sub-projects first.
-
When available, select Actions > Mark Project Complete.
-
Review and confirm the completion dialogue.
-
Reopen the project and verify Completed status.
The action is available only when the project's children and WIP assets are no longer in progress. Project completion is distinct from creating the finished assets; do not skip the WIP-to-asset steps.
The completion notice states that no further WIP assets, or sub-projects for a parent project, can be added after completion. There is no documented project-reopen control.